Let’s talk Drywall

We’ll take a break from our regularly-scheduled programming now to talk about something that’s a little less glamorous than an Insteon-enabled Smart Home: drywall. If you’re starting to get serious with home improvement and automation, it’s inevitable that you’re going to start having to get your hands dirty and start cutting open walls for one reason or another.

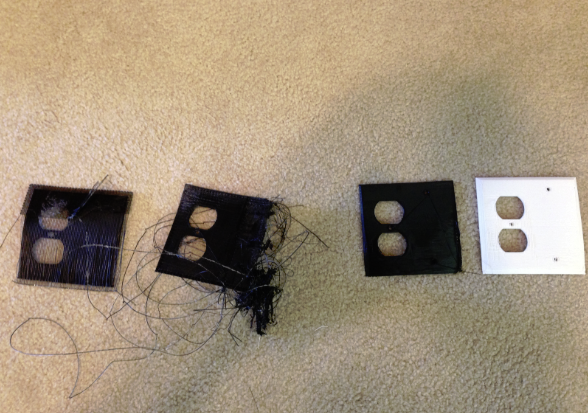
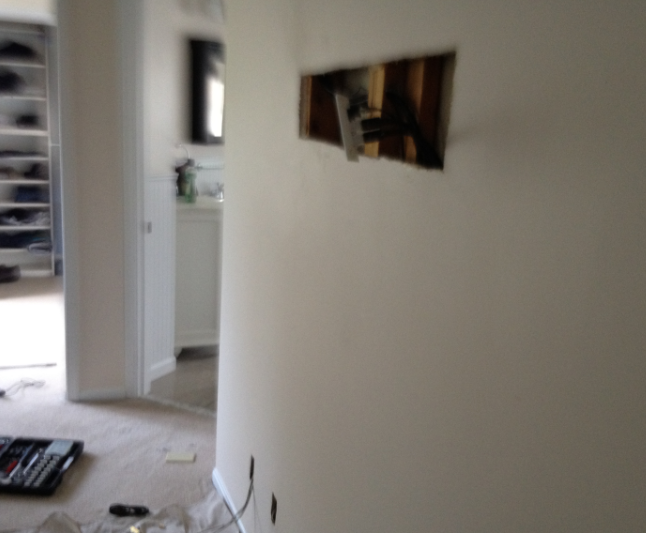
I remember months ago planning on installing a new electric outlet, and after a couple beers with a buddy I grabbed a jab saw and jammed it into the wall, proceeding to cut open a really messy hole above a set of electric switches. My buddy was appalled that I would be so callous but I had a trick up my sleeve: I was just beginning to learn the fine art of drywall repair, and for the first time I realized that walls are not impenetrable barriers to getting done what needs to get done.

Since then I’ve done a LOT of cutting for projects we’ll be featuring here, but let’s just talk about the mechanics of cutting and resealing a hole in your wall. Keep in mind that there’s pretty much nothing that can’t be fixed, and drywall falls on the low end of the spectrum in terms of skillset required for a repair. I’d much rather do that than fix a hole in the ceiling where a foot went through from the attic, but that’s a story for another day.

The basics behind drywall repair are as follows:

Cut the hole

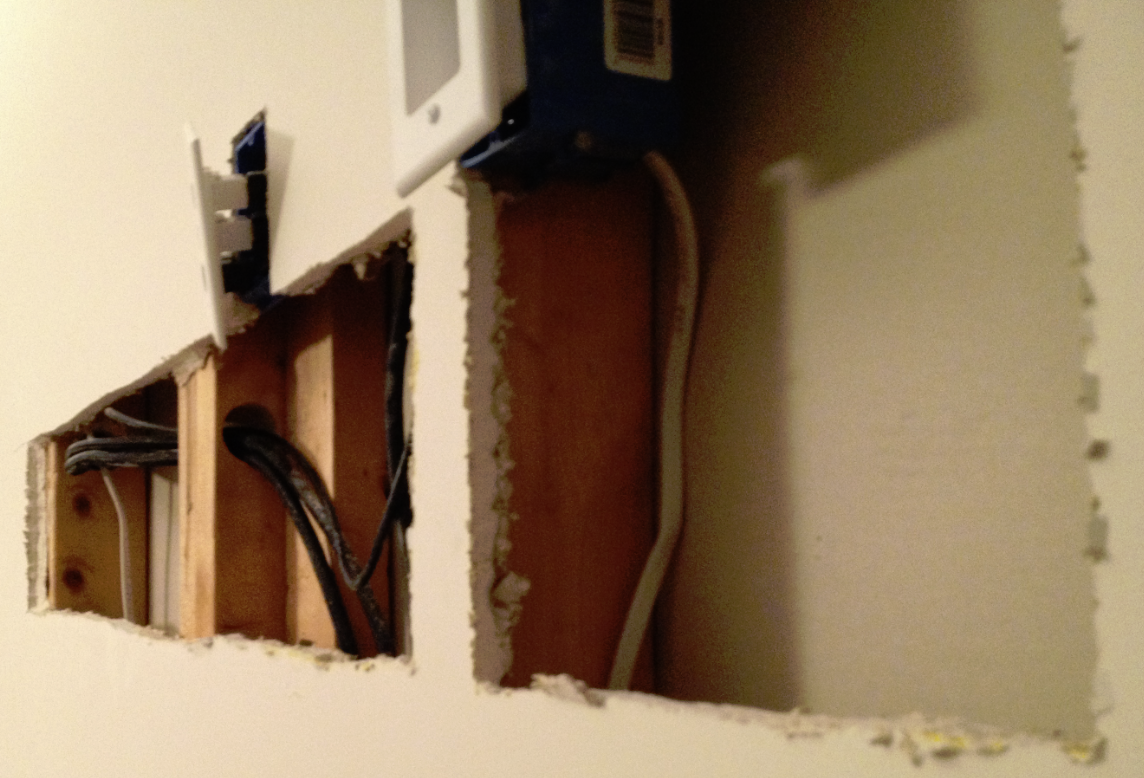
Cutting a hole in the drywall for whatever reason can be scary since it feels like it belongs in the domain of professional carpenters, but this really is the easiest part. You need access behind the wall, so just cut a hole as big as you need. You might be tempted to keep it small, but from experience, a larger hole is actually easier to patch than a small one, so don’t worry about the size.
drywall-hole
Some tips to remember here:

  • Remember that you can’t see what’s on the other side of the wall – ESPECIALLY things like electrical and cable wires. I suggest drilling a small hole and progressively getting bigger to make sure there’s nothing behind there that you could damage or could hurt you.
  • That pilot hole is nice to see what’s behind there, but it’s also possible to re-use the piece of drywall you’re cutting out so put the pilot in one of the corners of the area you’re planning to cut out so that you can re-set the original piece when you’re done. On the other hand, drywall is cheap at Home Depot; don’t kill yourself over saving the original piece.
  • It’s really easy to cut drywall between studs, but if you want to make the installation of the new piece easier, you should actually cut over the studs so that you can screw the new piece back in directly into the stud – otherwise it will be tougher connect the new piece to the wall. Two studs are even better to give your replacement piece a solid backing to attach to.

Do your work

We’re going to be talking about all kinds of projects that involve cutting drywall on this blog, so we won’t dwell on this step here.
drywall-install-wiring
Read more ›

Posted by Matt Chiste
July 7

Insteon KeypadLinc

Let’s continue to expand on our list of Insteon devices with the 8-button Insteon KeypadLinc, of which there is also a 6-button model. You install these guys just like you would a regular Insteon Switch, and while there is just one button (the top-left) that actually controls the “load” of the attached lights, the other 7 buttons can be added as controllers and responders to scenes, so that when a scene is activated the LED in the switch goes on.

This is incredibly powerful: most homes have multiple light switches in various locations such as at the front door, but instead of using one switch for one set of lights, you can now use a single box for up to 8 different scenes (which may or may not be a combination of lights at the same time). Of course, with existing wiring it may not be worth it to you to replace a 3-Gang box with a 1-Gang, but in new construction this is something you can consider so you don’t need to take up as much space:
keypadlinc

In the ISY-994i, each button shows up as a device that can be added as a controller or responder to various scenes. Generally when naming these devices, I use the naming convention of “.{device} | {location}”, so that i can see all of the device names listed alphabetically together, but also am able to see which actual switch that “device” belongs to. For example, the above KeypadLinc is in my Foyer, so you see various devices such as “.Chandelier | Foyer” and “.Dining | Foyer” (more on why I use the “.” prefix later):
keypadlinc-device

Before buying a KeypadLinc, remember the tips covered in the Insteon Switch Options post; you have to consider things like color, dual-band, dimming, and high wattage – although not all combination of options are available for the Keypadlincs, you may be able to save some money by forgoing dimming capability, for example. They also feature removable buttons that you can customize with a 4-Color LED Color Change Kit or a set of 50 buttons containing different text you can install.

Posted by Matt Chiste
July 5

Insteon Motion Sensor

As we continue to add to our Insteon Network, let’s toss an Insteon Wireless Motion Sensor into the mix. This motion sensor operates on a 9v battery (which is helpfully included), is wireless, and can be unobtrusively mounted in a corner using the included mounting bracket:
insteon-motion-mounting-bracket
Or, it can be mounted flush to the wall with some 2-sided tape (seen here with a
Foscam Camera):
insteon-motion-flush

It’s very well-documented on SmartHome’s Insteon Wireless Motion Sensor product page, but some key features include:

  • Wireless, adjustable sensitivity for both motion and light levels
  • Configurable to only detect motion when it’s dark (so that if it’s triggering lights they don’t turn on in the daytime)
  • Ability to control devices and scenes directly without a central controller
  • Decent battery life – 6 months to a year depending on the amount of motion and configuration

Once you’ve mounted it, it’s pretty easy to set up, keeping in mind that you’ll need a dual-band device such as this dual-band switch nearby so that it can communicate with the rest of your network. You add the device to your network, then add it as a controller for any of your scenes. It can also be a part of an ISY-994i program that will allow some advanced capabilities, which we’ll cover soon.

Posted by Matt Chiste
July 3

What are Insteon Scenes?

We’ve talked about Insteon Scenes in the context of the ISY-994i and the MobiLinc software, but now let’s look into what they are and what they can do in more detail.

What is a scene?
At its core, a scene is simply a collection of devices, the states associated with it (such as on/off or dim level), and how to get there (called “ramp rate” – you can do a slow dim of the overhead lights while instantly turning on the curio cabinet lights, for example). The always-helpful Universal Devices wiki has an informative page on scenes where you can learn how to create them. The example given on that page is the creation of a “movie scene”, where with one button press you can change the dim levels of multiple devices (such as lights) at one time. There’s also a possibility that you may create a “home” scene to turn on multiple lights at once when you come home at night, and turn them all off when you leave – or you could even create a separate “away” scene that turns off all the lights, but leaves the front porch light on at 100% brightness and the back porch at 75%.

What are scenes “normally” used for?
I’ve seen a high-end Crestron home that has LOTS of lights also have lots of reasonably complex scenes, where one button can turn on the hallway and the living room lights, for example. But in smaller and particularly retrofitted houses where you’ve installed Insteon after construction, scenes typically take on a different purpose. Why? Two reasons: first, in more modest homes you aren’t likely to have 14 different sets of lights in one location (such as a kitchen having a separate circuit for the can lights, overhead pendant lights, in-cabinet lights, under-cabinet lights, over-cabinet lights, etc.). Second, since the house was built with traditional switches it’s likely that various “paths” were already thought of in advance with the existing wiring. For example, the Crestron home I’ve seen had a very large second-floor hallway and landing area which had two separate circuits for each half of the hallway. A scene was used to turn on both halves at once, but technically they could be operated independently with different switches. With a more modest home you’d likely just have a single circuit powering the entire hallway anyway, so there’d be no need to create a scene to control both sets of lights at once.

Why do you need to use scenes?
So does that mean we don’t need to worry about scenes? No, it just means that you likely won’t be using scenes in the way that you usually read about (controlling multiple lights at once to create an actual “scene”). Instead, you’ll be using scenes to control multiple switches at once. In other words, while you often won’t need a single switch to control multiple lights, it’s much more likely that you’ll control a single light with multiple switches. Your house will have 2-way and 3-way switches all over the place (such as a light switch on each end of a hallway, or one at each of the 3 entrances to your living room). As we discussed in the past, with Insteon, there is no longer a one-to-one relationship between switches and the lights they operate. So while one switch will carry the “load”, actually connecting the power from the street to the lights themselves, the others in these multi-way switches will simply communicate with that load-bearing switch the respective commands such as on, off, or dim. For this you’ll use scenes, which are basically a level of abstraction that you should understand. Instead of thinking about the switch at one end of a hallway communicating with the switch at the other end to turn the lights on, you should think of either switch telling the “system” to turn a “scene” on and off, and the other switch simply responding to the state of that scene.

How do scenes work?
The key thing to understand here is that in the context of Insteon there are devices and there are scenes. Each device can be a controller, a responder, or both. Insteon switches are both because they not only control things by sending signals, they also respond to things by illuminating the LEDs on the switch itself to show their status. Motion Sensors on only controllers because they don’t receive any commands, and the Insteon 8-watt light bulb is only a responder because it doesn’t actually offer any “inputs” like a switch does, so it can’t control anything.

In the ISY-994i, devices that are both controllers and responders show up red, and devices that are only responders show up black. The interface also shows you which scenes the device controls and responds to:
controllers-responders-devices Read more ›

Posted by Matt Chiste
July 1

Duct Tape? That’s nawt a tape. THIS is a tape…

I know you can make pretty much anything out of duct tape, and from its wiki page, just now learned that apparently it’s not actually good for taping ducts. When I moved into my house, I bought several rolls of the stuff, but now several years later I’m surprised how rarely I’ve actually used it for practical home automation and improvement projects.

Instead, I have found that the two-sided Heavy Duty Mounting Tape is great for indoor use such as hanging pictures or motion sensors and a similar version is great for heavy-duty or outdoor use, such as hanging address numbers or mounting heavier hardware. I’ve used this tape on many upcoming projects that we’ll be talking about, and strongly recommend having a roll of each handy for your own projects.

3m-tape


Read more ›

Posted by Matt Chiste
June 28

Fun with a MakerBot Replicator

If you’ve been keeping up with tech news lately, you’ve likely heard quite a bit of controversy about 3D-printing lately. But you’ve also probably heard about how 3D printing is the next industrial revolution. The MakerBot Replicator 2 is one of the top consumer 3-D printers out today. It’s not exactly cheap, but for the cost of a high-end desktop computer you, too, can be part of this revolution. I have the first-generation MakerBot Replicator, and wanted to share some thoughts on it since I have actually designed and “printed” objects that I’ll be featuring in some upcoming projects related to Home Automation.

  • Printing is not incredibly easy or fast. I thought I would just plug this thing and it would be as simple as an ink-jet printer to print out parts. While it is reasonably straight-forward to connect and print designs (either downloaded or custom-made), these things can be finicky. Without the proper build plate leveling, application of the kapton tape, and ensuring proper adhesion, you’re likely to end up with more than a few messes where the plastic misses its mark and just extrudes all over. It took me more than four tries to print out a simple outlet cover – each at about 30 minutes to an hour before “finishing”:
    makerbot-outlet-cover-fails
  • Complexity is still limited. 3-D printed guns (regardless of how the American Public perceives them) are actually pretty simple devices – basically a strong tube with a firing pin at one end. While the promise of being able to print a fully-functional cell phone looms on the horizon, the reality is that the current technology typically uses only plastic and extrudes small strings of plastic one layer at a time – which means you can’t even print things with sharp overhangs on it, because there’s nothing beneath it to support it. Still, the printing of individual gears (not complex moving moving machinery) and other small things like outlet covers is still possible.
    3-d-gun-credit-forbes
    (Image credit: Forbes)

Read more ›

Posted by Matt Chiste
June 26

Foscam Indoor Camera

As you improve your home with your Insteon network, another cheap and easy addition to your security system is a wireless security camera.

Foscam makes a ton of different models, and they’re all pretty great products for the price. I have a couple of the Foscam FI8918W Cameras, but there are a ton of them. You’ll notice on Amazon they show up under all different names from different resellers, but most are just white-labelled from Foscam.

These cameras are cheap ($50-$100), and include a ton of great features, such as wired and wireless connections, the ability to pan and tilt them from a web interface, and night vision with infrared. Most even have two-way audio so you could theoretically have a conversation with the FedEx guy at your front door from your phone at work – although frankly the audio isn’t great and this isn’t a feature I often use. Perhaps it would be better as a simple baby monitor – having an iPad in the Kitchen would allow you to see (and hear) the baby’s room without having to, you know, actually understand every word in a two-way conversation.

They are pretty un-obtrusive depending on where they’re installed, such as this location on my front porch:
foscam-front-door
… but keep in mind that although the network connection can be wireless, you’ll still need an outlet nearby. In my case, I installed that outlet up there, and we’ll discuss how that’s done at another time.

The web interface is passable, working with all major browsers, but keep in mind that only Internet Explorer supports the two-way audio feature because it relies on an ActiveX control:
foscam-web-interface
Read more ›

Posted by Matt Chiste
June 24
 Subscribe to HomeAutomationGuru.com
    Add to Google Reader or Homepage

Enter your email address to subscribe: