Communicating from the ISY-994i to Blue Iris

A few months back I wrote about the Blue Iris Mobile App, and how you could configure it with a geofence similar to MobiLinc that allows Blue Iris to record video and notify you of motion detection when you’re not home.

In that post’s comments Sagi Geva mentioned his system has even more integration between his Blue Iris installation and his ISY-994i. While I’ll certainly do a how-to post on that kind of integration (get Blue Iris to tell the ISY motion was detected), I had a more immediate need: get the ISY to tell Blue Iris that motion was detected. Specifically, my problem is that the camera on my front porch faces a road where car headlights sweep across it when turning. This fools Blue Iris into thinking that motion is detected because the pixels in the image change. As a security system, it’s not great when this “motion” triggers a false alarm every time a car drives by.

The solution turns out to be similar to Sagi’s suggestion: using a remote API, only this time we’re talking about using the JSON interface built into Blue Iris rather than the one built into the ISY-994i. Specifically, the Insteon motion sensor I have on the porch uses infrared heat to detect motion rather than just light, so it’s much less prone to false alarms (although they do occasionally happen). So what we want to happen is that the camera will only trigger a recording when the motion sensor detects motion, rather than when the camera detects motion.

To do this, first turn off motion sensing in Blue Iris for each of your affected cameras. Remember that if you are using the geofence system I described a few months ago, you’ll want to do this for every relevant profile:
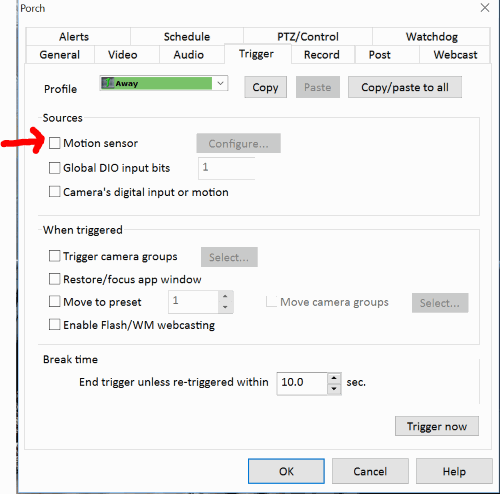
blue-iris-turn-off-motion Read more ›

Posted by Matt Chiste
November 19

Home automation tips for new construction projects

A few months back, reader Billy wrote:

We’re building a new house, and what better way to get in when you have all the walls open to begin with. I was wondering if you had any recommendations? Maybe you could do a blog post on things you’ve learned or would do differently.

It’s a great question, and I’m just now circling back to it because I’m actually moving myself this week. Although it won’t be new construction, it will certainly spawn a whole new set of projects to write about, and I realize the tips I sent Billy are relevant even if you’re not dealing with new construction. Here they are:

  • Electrical wiring. First, the beauty of Insteon is that you don’t really need to do any specific wiring for it; switches communicate over power lines and wirelessly, so there aren’t many INSTEON-related wiring considerations to communicate to your electrician. That said, there are some things to consider if you’re planning on going all-Insteon in your home:
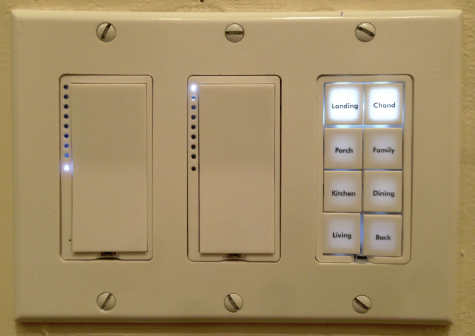
    1. With Insteon, the concept of switch-to-circuit location isn’t as important. For example, many homes have a panel of 4-5 switches by their front door to control things like the porch lights, the chandelier, the stair lights, the hallway, etc. But in one client house we actually installed all the switches for those circuits in a closet nearby. So if there was traditional wiring, you’d actually have to open the closet door to turn on any of those lights because those switches controlled those circuits. But since this was Insteon, we were able to install a single circuit by the front door that controlled the porch light. But instead of having a simple switch there, we installed a KeypadLinc that would remotely control all those other switches/circuits hidden in the closet. You don’t HAVE to do this, and could wire your house completely “normally” (useful if maybe you want to yank out the Insteon system at some future date), but having a single Keypad with 8 buttons gives a cleaner look than a bank of a half-dozen switches. In my house I did Insteon as a retrofit, so I had a 3-gang box by the front door for the stairs, porch, and chandelier. I replaced one of the receptacles with a KeypadLinc, so my setup doesn’t look as clean but has the same effect – plus I can turn off a bunch of OTHER lights in the house on my way out the door.
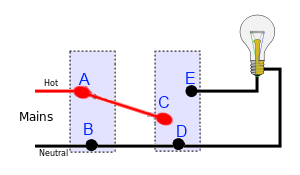
    2. The wiring for 3-way circuits is different. Specifically, say you have stairs that need a switch at the top and bottom to control the lights. Normally you’d do this “mechanically” so that both switches control the lights with a toggle. But with Insteon, you power both switches independently. Only one of them actually controls the lights – and the other one sends digital signals to the first to tell it to turn on. See this post for a refresher on how this works.

Read more ›

Posted by Matt Chiste
November 15

ISY-994i QuickStart: basic programming (actions)

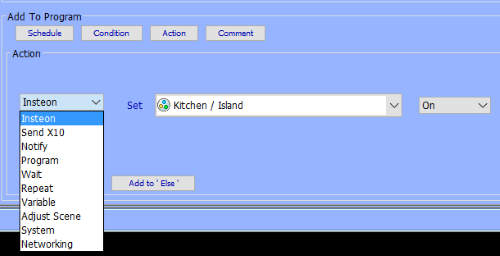
On the heels of the post about ISY-994i programming conditionals, let’s take a look at possible actions you can take in “Then” and “Else” clauses of your programs. You can see the list after clicking the “Action” button under “Add to Program”:
isy-program-actions Read more ›

Posted by Matt Chiste
November 11

ISY-994i QuickStart: basic programming (conditionals)

Continuing our QuickStart mini-series, let’s cover the basics of ISY-994i programming. I’ve covered lots of programs over the years, but apparently, as a reader pointed out, I never covered the very basics of the structure.

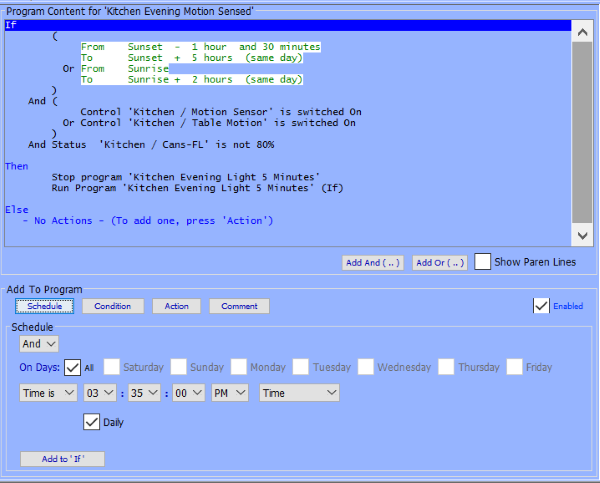
Programs follow a pretty basic “if-then-else” structure. Let’s take a look at probably one of the most complicated programs I have, which you’ll see isn’t that complicated at all when you break it down into its parts:

isy-program-basics

I touched on this concept at the end of my last post about scenes in an example of how you could activate lights with a motion sensor via scenes or programs; this is one of my programs for accomplishing that goal.

We won’t go into exactly what this program does (perhaps another time…) because for now we’re just looking at the structure. As you can see, there’s an “if” clause in this program, and a “then” clause, but no “else” clause. The “then” clause is pretty straightforward and is restarting another program, but the “if” clause is a compound statement that deserves a closer look. Basically by using the parentheses (added with the buttons that say “Add And (…)” and “Add Or (…)”), we have three parts that make up this compound conditional.

  1. The first part itself has an “or” clause in there; you can see the dropdown that says “And” in the bottom box titled “Schedule”. When adding a clause to a conditional, you make this box either “And” or “Or” before clicking “Add to ‘if'”. This part is basically saying “this statement is only true if the time falls into certain hours around sunset OR certain hours around sunrise“.
  2. The next part says “this statement is only true if motion sensor A turns on OR motion sensor B turns on.”
  3. Finally, we say “this statement is only true if the kitchen light is NOT 80%.”

Once we execute each of those three statements to figure out if each of them are true, we join them together to basically say “run the THEN clause if part 1 is true AND part 2 is true AND part 3 is true. Otherwise run the ELSE clause (i.e., do nothing).”. So the next question is how does the program run at all, and when? Well, it essentially runs all the time, but nothing happens because not all of the “If” conditions are met. Every time the time of day, the state of a device, or a state variable (but NOT an integer value) changes within the ISY, every program’s conditionals are checked. So in this case:

  • Every minute the program “runs” and the first condition is true some of the times of the day, but not all.
  • Every time any device in this program changes state, the program “runs”. The second conditional is true if a) that device is one of those motion sensors, and b) the state of the motion sensor is “on”.
  • If we had state variables here (like those set when we enter and leave a geofence), the program would run when those changed.
  • Note the difference between the word “Control” in the second part, and “Status” in the third part of my program. You use “Control” when you want to test how a device was turned on, and you use “Status” when you want to test the brightness level of a device.

Read more ›

Posted by Matt Chiste
November 9

ISY-994i QuickStart: scenes and link tables

I’ve written extensively about Insteon Scenes, and discussed some things to consider when diagnosing problems with scenes, but I thought for the sake of completeness in the ISY-994i QuickStart mini-series, scenes should be included. So here’s a question from reader Ashu:

I do understand the use case for creating a scene where multiple devices need to controlled together but if there is a need to control just one device, say a lonely light bulb in the spare room – would you still create a scene for that device?

The reason why I ask is becasue per ISY documentation: “Once programmed, scenes operate completely independent of the ISY for the quickest response time and most reliable operation” — does that mean there is some performance/efficiency to be gained?

Here’s my response:

In general, I create scenes for virtually everything, even those single-bulb scenarios like Ashu mentions. Here are a couple reasons why I do it:

  • I use MobiLinc and there are separate screens for “scenes” and “devices” so I don’t want to have to switch back and forth to control one or the other.
  • Oftentimes even if you do have a lonely light bulb, you may end up adding another switch to control it. For example, maybe you have a KeypadLinc in another room that you want to control that lone bulb; a scene allows you to connect multiple devices later on.
  • Insteon devices fail, so by controlling devices through scenes it provides a bit of an abstraction so that when you replace a device you don’t have to change the scene you’re controlling (or any programs or Amazon Echo commands that may reference that scene).

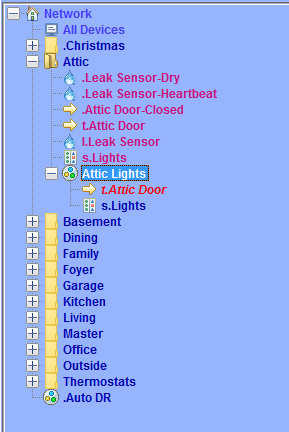
All of those reasons are a bit nebulous and don’t really answer the technical question about whether you should create a scene to control just one device. First off, let’s explain what the ISY doc means. Basically, they’re talking about multi-device scenes, and they’re referring to the fact that all Insteon devices have a built in “link table”. You can see this in the ISY by right-clicking a device, then going to “Diagnostics: Show Device Link Table”. The link table is how the device knows who to send messages to and receive from. Take this example – I’ve got lights in my attic and I control those lights with an open/close sensor so that the lights go on when the ladder is dropped down:

insteon-link-table

I have a “scene” called “Attic Lights” with two devices in it – the Open/Close sensor as a controller and the Light switch itself as a responder. Open the door, lights go on. But under the covers what the ISY does is write to the link table for those two devices so that they send messages directly between them without having to communicate with the ISY at all. So even if I unplugged the ISY, this would all still work because the devices are communicating “completely independent of the ISY for the quickest response time”.

Read more ›

Posted by Matt Chiste
November 7

ISY-994i QuickStart: folders and naming conventions

Today’s ISY-994i QuickStart post addresses the question: “Once I’ve added devices, how should I organize them?”

There’s no “right” way to organize your folders and devices, but here are a few tips that I’ve applied over the years to keep things organized.

isy-folders

Read more ›

Posted by Matt Chiste
November 5

ISY-994i QuickStart: Adding devices to the ISY-994i

Continuing our QuickStart series of posts about the fundamentals of basic ISY configuration, today we’ll cover two ways to add a device to the ISY-994i.

Without getting too technical, when we add a device to the ISY, in addition to telling it that this device “exists”, we’re also telling it to add an Insteon link to the device itself and to the PowerLinc Modem (PLM). It does this because we want the device to send a message to the PLM every time its state changes – and every time the PLM gets this message, it’s available to the ISY to update the status, run programs, etc.. In other words, when you turn on a device, you want the device to say “On” when you’re looking at the ISY application.

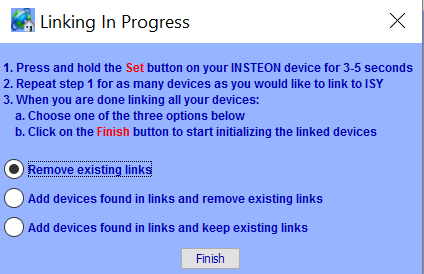
The first and easiest way to add a device is to go to “Link Management:Start Linking”. Essentially what this does is tell the PLM to start listening for devices on the network that are ready to link.

isy-start-linking

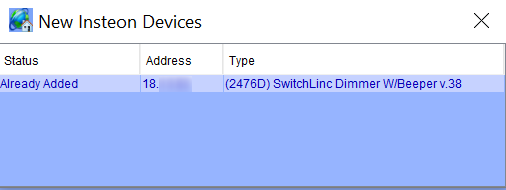
You would then put the device you want to add in “linking mode” by pressing and holding the set button on that device for a few seconds. It will then send a signal that is picked up by the PLM, and the ISY lets you know it’s ready to configure the link tables and for you to name the device.

isy-start-linking-already-added

Here’s the thing: I don’t really advise this method of adding a device. I’ve had only limited success with it, and it doesn’t seem to work well with wireless devices like RemoteLincs. I don’t exactly have proof of this, but I’ve also been concerned about adding multiple devices at once. Specifically, if you don’t have an ISY or PLM, this is how you link devices together – by putting one device in “linking” mode, then do the same on the next device. So if you do have the ISY and put two devices in “linking” mode at the same time, I think it’s possible to accidentally link those devices to each other. If that happens, you may end up with one device turning on when you click a different switch – not something we’re looking for in this case!

Read more ›

Posted by Matt Chiste
November 3
 Subscribe to HomeAutomationGuru.com
    Add to Google Reader or Homepage

Enter your email address to subscribe: