I’ve called the Blue Iris desktop application a “must-have for Foscam security cameras owners“, and while I wasn’t happy with a broken firmware setting in the cameras, I still highly recommend the combination. In fact, the application got even better since that original post with the release of Blue Iris 4.0, adding neat features like a timeline to the view. And then, for me at least (apparently this little gem has been around for almost 3 years!) I discovered the Blue Iris Mobile App (available for iPhone and Android), and it got even better.
The Blue Iris App
Installing and connecting the mobile app is simple enough – you just enter part of your license key to pull your remote IP address and enter a user name and password. This part requires a bit of firewall tuning to open a port up, and in my case I have a personal domain which meant I had to manually enter the connection info, but it shouldn’t be too hard if you have experience with firewalls. The Blue Iris desktop application has a handy “Remote Access Wizard” to help you out, although it still requires a bit of technical know-how.
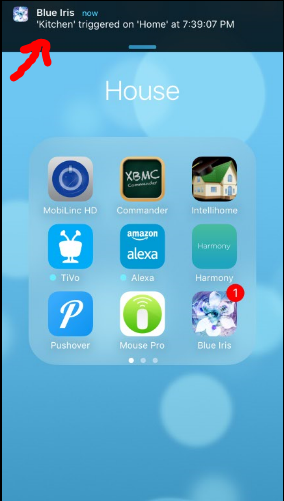
Once installed, you can view real-time and recorded video easily through the app – it even counts recorded clips from cameras so you can tell at a glance how many have been recorded – even when the app isn’t running (on the iPhone at least, the number of alerts shows up as a notification icon):

Geo-fencing app setup
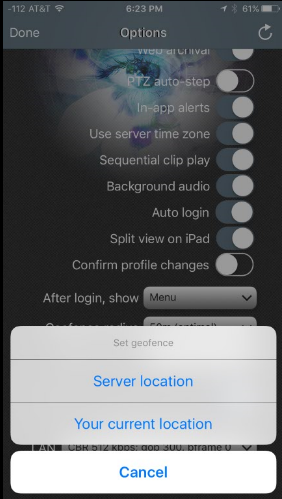
The app, like MobiLinc, has a geo-fence feature, which means you can go into settings and set the radius for your geo-fence. You’ll want to do this at home, and select “Your current location” when specifying a fence (50m is recommended, which means when you go further than 50 meters from home, you can define different behaviors for your cameras).
Configuring the desktop application profiles
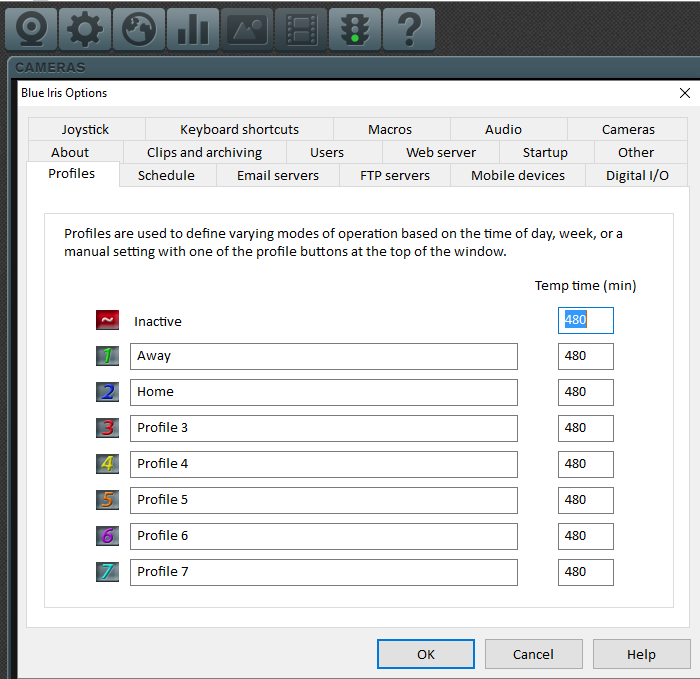
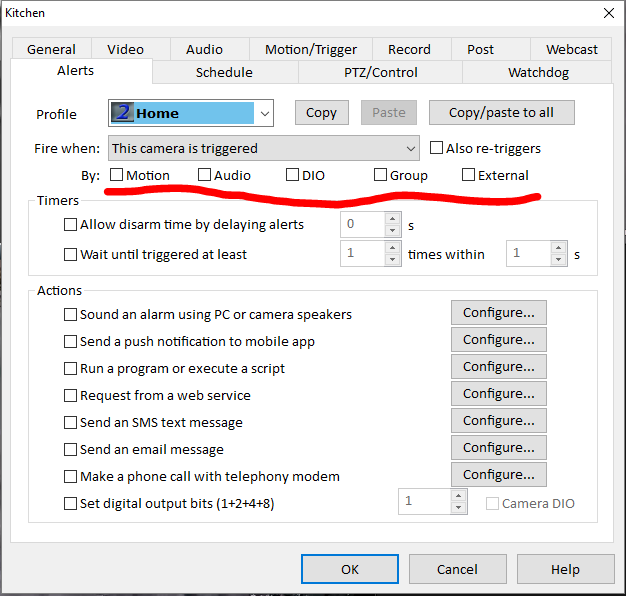
It gets a little trickier in configuring the desktop application to work with the app – specifically, getting it to behave differently based on the geo-fence on your phone. For this we’ll use profiles in Blue Iris. So first, let’s go ahead and name our profiles – we’ll call #1 “Away” and #2 “Home”:
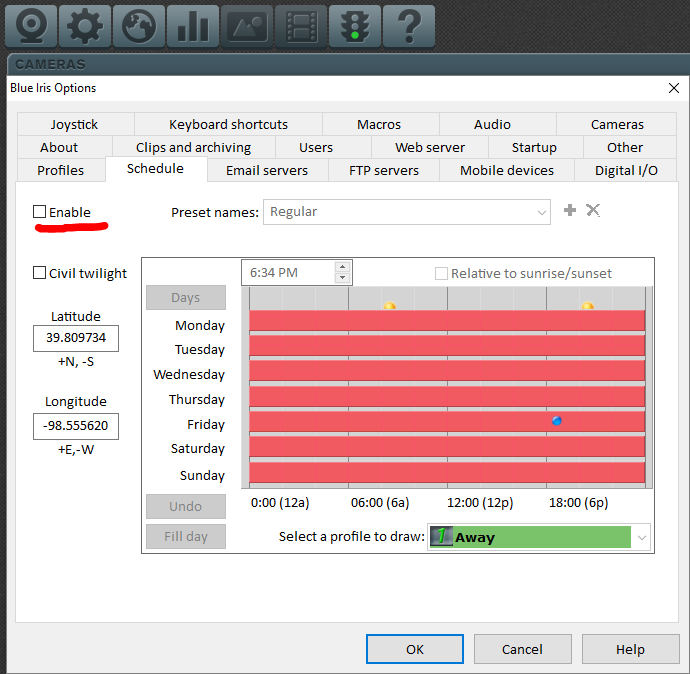
Profiles are used to define different behaviors for your cameras, and one of the key features of profiles is to do things on a schedule. For example, if you use Blue Iris in a commercial setting, perhaps you want to be able to monitor but not record workers during the day, but want to trigger alerts if motion is detected at night. In our case, we want don’t want to deal with changing profiles on a schedule, so let’s turn that feature off by un-checking “Enable” in the “Schedule” tab:
Finally in the global settings, we’ll go to the “Mobile Devices” tab. There, if the mobile app has been set up right, you’ll see your phone in the list. Click it, then click the “Enter Geofence” button. Here, we’ll want to set the profile when we enter the geo-fence (in other words, come home). You can also click “Push Notification” so the mobile app alerts you on your phone when you come and go – but this can get a bit annoying, since you probably already know when you’re home or not. If you’re not sure whether you are home or not, you should probably check out a different blog…
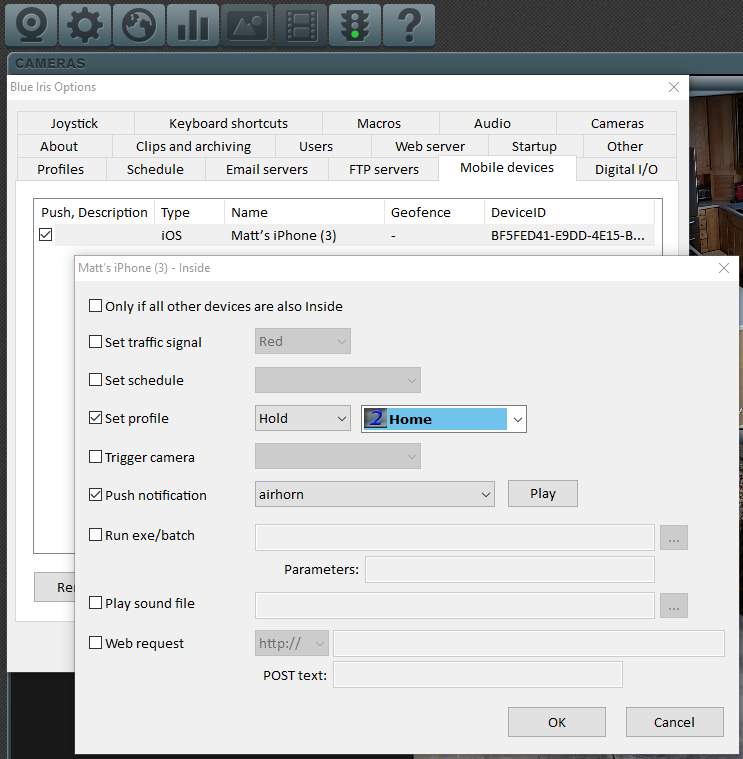
After clicking “Enter geofence…” and selecting “Set Profile” to “Home”, do this again with the “Exit geofence…” button but set the profile to “Away” (optionally sending a push notification). If you have more than one family member with the app, you can use the check box “Only if all other devices are also Outside” on this screen. That way, the Blue Iris profile will only switch to “Away” when ALL of you are away from home – so that if only you are away but your spouse is home, you don’t get a string of notifications as motion is detected.
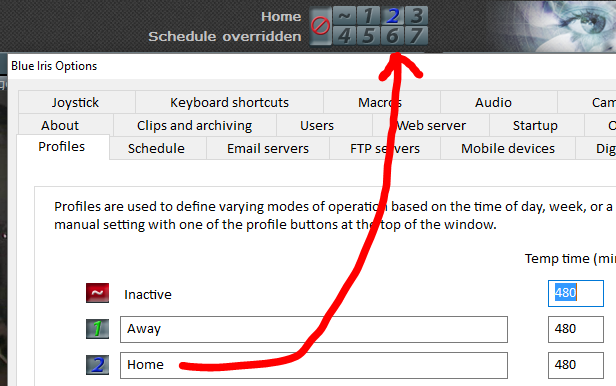
Now we’ve got profiles set up for “Home” and “Away”; you can see which profile is currently enabled with the numbered buttons at the top of the window. When we’re all set up, you can use these buttons to test alerting and recording in the “Away” profile even if you’re not away – just click the “1” for the “Away” profile:
Camera Setup – Triggers
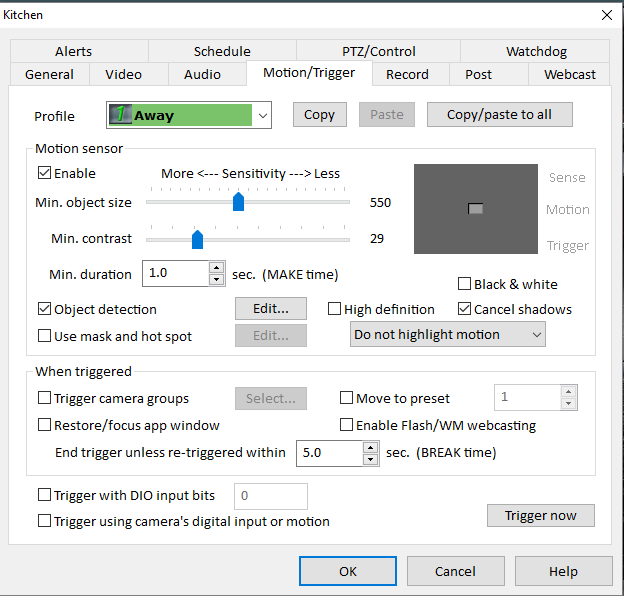
OK, still with me? Now as you (and others in your house) come and go, the profile in Blue Iris will switch between the “Home” and “Away” profile, so we need to configure cameras individually to do different things based on these profiles. Going into all the settings is beyond the scope of this article, but let’s right-click a camera, choose “Camera Properties”, and take a look at some of the settings. For the purposes of this exercise, everything will revolve around “triggers”, or events that occur when motion is sensed – so let’s look at that tab first. Notice that (like other tabs in the configuration form) there’s a “Profile” selection that allows you to do something different based on which profile is active. For the trigger, I generally want a trigger to fire whether I’m home or not, so my settings look like the following. Specifically, I have checked “Enable” under “Motion sensor”, and then I click the “Copy/paste to all” to get this setting to apply to all profiles.
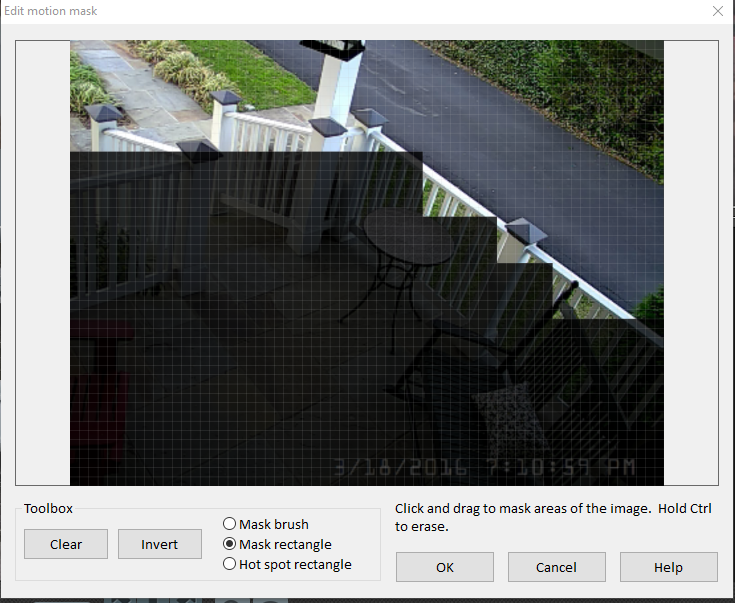
One other neat feature here is the “Use mask and hot spot” button, that allows you to specify specific areas of the camera’s frame on where to detect motion, and ignore other areas. For example, if I only wanted my camera to detect motion on my porch, but not my driveway, I could specify a mask like the following. It’s not perfect – especially this example – because as a car pulls in at night with headlights on, it’s still going to trigger motion as the porch lights up in the headlights.
Camera Setup – Recording
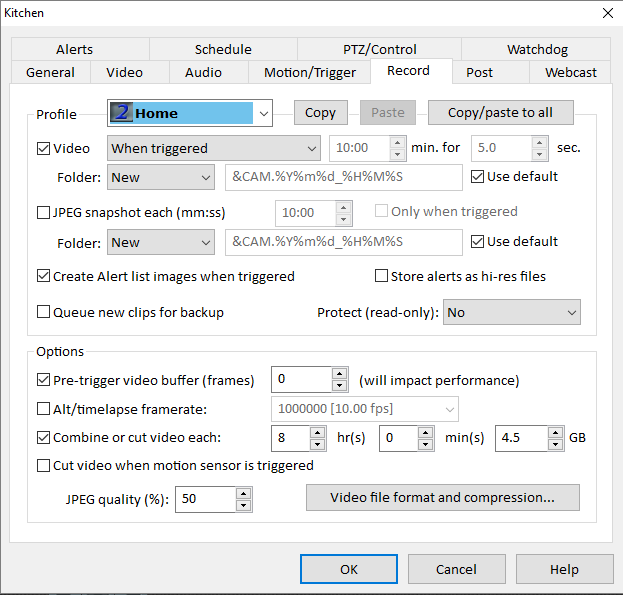
Next, decide when you want cameras to record, and when. For example, perhaps you only want outside cameras to record when you are home, and all cameras to record when you’re away (in case an intruder is detected). Like the “Trigger” tab, the “Record” tab lets you decide to do based on the profile. You can either choose to do the same regardless of profile (change what you want, and click “Copy/paste to all” to apply those settings to all profiles), or you can turn off options based on profile. So, perhaps you may want to select the “Home” profile and un-check “Video”, and then select the “Away” profile and check it to only record video when you’re not home.
Camera Setup – Alerts
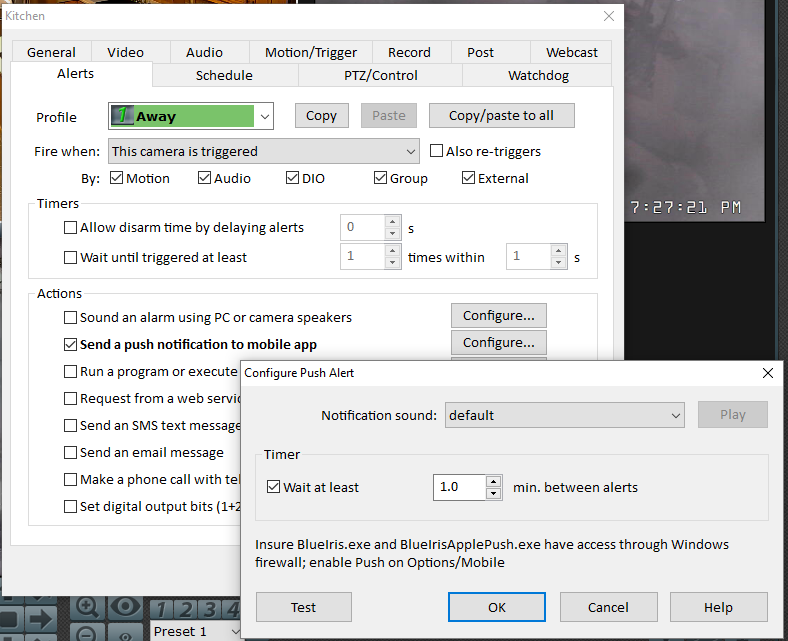
Alerts are used to notify you when something happens – basically, when a trigger fires (although you can define other things such as when any camera’s trigger fires). Here is where things will definitely start deviating between “Home” and “Away” profiles – you don’t need to be alerted when motion is detected inside your house when you’re home. You may, of course, want a notification when you’re home and someone walks up on your porch, but this is where you start defining individual behavior for each camera depending on what the camera is looking at. In my case I’ve turned off all alerts when I’m home for my Kitchen camera, but I want a push notification sent to my phone if any motion is detected in the Kitchen when I’m not home!
Back to the App
We’ve now set up the mobile app to use a geo-fence, configured global settings in the desktop application to toggle profiles based on the app, and configured individual cameras to do different things such as record or notify based on those profiles.
One thing I found a bit strange in the mobile app is that the number that shows up on the app icon is not alerts, but recorded clips. Notifications (if you select the “send push notifications” shown above) are instant messages sent to your phone as seen at the top of this screen shot – but that number on the Blue Iris app icon is the number of clips I haven’t yet viewed on my phone. In a perfect world, I would want that number to ONLY show up as the number of alerts that have fired, not the number of recorded clips, because my cameras are recording all the time, and when I’m home I don’t care to see that number when the mailman walks on the porch and triggers the camera – I just want to see how many alerts have happened when I’m not home. Maybe in the next version of the app – it is still under active development!


First of all – just wanted to say that I love your blog. My RSS feed always picks up the latest and I like reading it, so keep up the good work!
I have a very advanced setup of ISY994 IR/Pro + Zwave, connected to over 50 Insteon devices, with Amazon Echo, HA Gateway and Blue Iris. One more thing that is worth mentioning – In the Blue Iris “Alerts” screen you have an option to “Request from a web service” – with ISY this is one of the coolest features as you can trigger any device, scene or program using the REST interface. For example if my front door camera detects motion at night it’ll automatically turn on the kitchen and dining room lights (only if I’m away) to appear like someone is home. Thought this info can be useful for all ISY / BlueIris users.
Great point Sagi – that REST API for the ISY is really powerful, and I was planning to do a post on it at some point – will definitely need to include this neat idea of using the camera to detect motion in lieu of a dedicated Insteon motion sensor. Thanks for reading!
Do you know what the “stats” are for under your title in the mobile app? Mine reads;
Clips: 127 files, 148.9g/621.0g
!! c: -53.1g
All in red font
huh, it’s a mystery to me, and the help file just says “stats such as uptime and storage utilization”. I just checked mine again, and the first two numbers are:
1) Number of clips in the “New” folder (i.e., if motion was detected and recorder)
2) The size of all those clips combined
The third number looks like it’s disk free space, but on my system I have about 109GB free and the number in the app is 89.5GB, so that doesn’t seem to be it.
The next line for me is also a mystery; it starts with the drive letter (for me, it starts with “E:”, and for you it looks like “c:”) but I can’t figure out where the next number (for me it’s +48.3G) comes from.
Anyone else have any other ideas on what these stats are for?