A few months back, reader Billy wrote:
We’re building a new house, and what better way to get in when you have all the walls open to begin with. I was wondering if you had any recommendations? Maybe you could do a blog post on things you’ve learned or would do differently.
It’s a great question, and I’m just now circling back to it because I’m actually moving myself this week. Although it won’t be new construction, it will certainly spawn a whole new set of projects to write about, and I realize the tips I sent Billy are relevant even if you’re not dealing with new construction. Here they are:
- Electrical wiring. First, the beauty of Insteon is that you don’t really need to do any specific wiring for it; switches communicate over power lines and wirelessly, so there aren’t many INSTEON-related wiring considerations to communicate to your electrician. That said, there are some things to consider if you’re planning on going all-Insteon in your home:
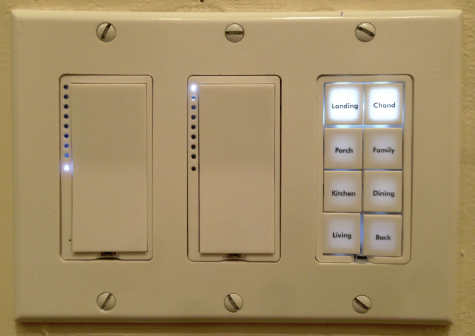
- With Insteon, the concept of switch-to-circuit location isn’t as important. For example, many homes have a panel of 4-5 switches by their front door to control things like the porch lights, the chandelier, the stair lights, the hallway, etc. But in one client house we actually installed all the switches for those circuits in a closet nearby. So if there was traditional wiring, you’d actually have to open the closet door to turn on any of those lights because those switches controlled those circuits. But since this was Insteon, we were able to install a single circuit by the front door that controlled the porch light. But instead of having a simple switch there, we installed a KeypadLinc that would remotely control all those other switches/circuits hidden in the closet. You don’t HAVE to do this, and could wire your house completely “normally” (useful if maybe you want to yank out the Insteon system at some future date), but having a single Keypad with 8 buttons gives a cleaner look than a bank of a half-dozen switches. In my house I did Insteon as a retrofit, so I had a 3-gang box by the front door for the stairs, porch, and chandelier. I replaced one of the receptacles with a KeypadLinc, so my setup doesn’t look as clean but has the same effect – plus I can turn off a bunch of OTHER lights in the house on my way out the door.
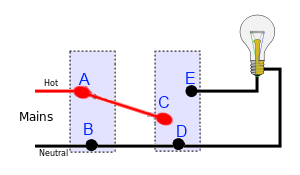
- The wiring for 3-way circuits is different. Specifically, say you have stairs that need a switch at the top and bottom to control the lights. Normally you’d do this “mechanically” so that both switches control the lights with a toggle. But with Insteon, you power both switches independently. Only one of them actually controls the lights – and the other one sends digital signals to the first to tell it to turn on. See this post for a refresher on how this works.
- With Insteon, the concept of switch-to-circuit location isn’t as important. For example, many homes have a panel of 4-5 switches by their front door to control things like the porch lights, the chandelier, the stair lights, the hallway, etc. But in one client house we actually installed all the switches for those circuits in a closet nearby. So if there was traditional wiring, you’d actually have to open the closet door to turn on any of those lights because those switches controlled those circuits. But since this was Insteon, we were able to install a single circuit by the front door that controlled the porch light. But instead of having a simple switch there, we installed a KeypadLinc that would remotely control all those other switches/circuits hidden in the closet. You don’t HAVE to do this, and could wire your house completely “normally” (useful if maybe you want to yank out the Insteon system at some future date), but having a single Keypad with 8 buttons gives a cleaner look than a bank of a half-dozen switches. In my house I did Insteon as a retrofit, so I had a 3-gang box by the front door for the stairs, porch, and chandelier. I replaced one of the receptacles with a KeypadLinc, so my setup doesn’t look as clean but has the same effect – plus I can turn off a bunch of OTHER lights in the house on my way out the door.
- Centralize control/media room. I’d try to find a “server room” if you have space somewhere, even if it’s just an out-of-the-way closet. Definitely ask your builder to give it great A/C ventilation – make sure at least they put one or two A/C vents in there to keep things cool, which is something they won’t do by default (because normally people don’t worry about their coats getting warm).
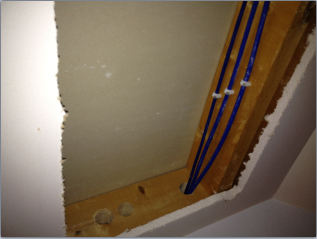
- Wire Cat6a ethernet cable everywhere. Wire high-quality in-wall CAT6a or CAT7 ethernet cable EVERYWHERE going back to that server room – even non-obvious places where think you might someday need it. For example, I’d definitely do two cable runs to each TV location (one for HDMI signal, and the other for actual network connection to smart TV). But also think about, for example, where you might like security cameras or other network devices. Using PoE (power over Ethernet) you get a two-fer for security cameras – one, you don’t need a power outlet, and two, you’re not congesting your wifi network with wireless IP camera traffic. This installation would have been much easier if I just had an Ethernet cable going to that location, either from under the eave or on the inner wall. One thing to note here is that you should always make sure the cable is rated for “in-wall” installations, and you use the best cable you can to future-proof as much as possible. At the moment, that’s probably going to be Cat6a (which, if you’re familiar with network cables, means each individual twisted pair is shielded to prevent interference) rather than Cat7 (which isn’t even an official standard yet, and I haven’t had much luck finding in-wall version of this cable).
- Consider ethernet cable for low-voltage wire runs. I’d also consider running LOW voltage wire (or even Ethernet cable as well, which can handle low amounts of power) to all places where you’d may want to install devices, such as motion sensors, open/close sensors, or even a wall-mounted display. That way, you could centralize power distribution with a DC Adapter, and not have to worry about replacing batteries.
- Consider “unconventional” uses of running in-wall cable before the drywall goes up. I’ve been working on and off for years on automating my blinds but never committed a huge amount to it yet. I have one window wired with a battery-operated motor (see picture at bottom of this post). As I consider a full-house implementation, I find myself wishing I had an Ethernet cable running above all the windows in the house to be able to tap in with control wires and power, so that I wouldn’t need to battery-power these things and could control the blinds from a button on the wall. That’s probably a little “out-there” when considering the kind of wiring you actually want to put in-wall, but you can get 1000 feet of in-wall Ethernet cable for pretty cheap so it’s a drop in the bucket cost-wise when building a house (another thing to consider, though is the cost for the electrican to run all that wire).


