A few months back I wrote about the Blue Iris Mobile App, and how you could configure it with a geofence similar to MobiLinc that allows Blue Iris to record video and notify you of motion detection when you’re not home.
In that post’s comments Sagi Geva mentioned his system has even more integration between his Blue Iris installation and his ISY-994i. While I’ll certainly do a how-to post on that kind of integration (get Blue Iris to tell the ISY motion was detected), I had a more immediate need: get the ISY to tell Blue Iris that motion was detected. Specifically, my problem is that the camera on my front porch faces a road where car headlights sweep across it when turning. This fools Blue Iris into thinking that motion is detected because the pixels in the image change. As a security system, it’s not great when this “motion” triggers a false alarm every time a car drives by.
The solution turns out to be similar to Sagi’s suggestion: using a remote API, only this time we’re talking about using the JSON interface built into Blue Iris rather than the one built into the ISY-994i. Specifically, the Insteon motion sensor I have on the porch uses infrared heat to detect motion rather than just light, so it’s much less prone to false alarms (although they do occasionally happen). So what we want to happen is that the camera will only trigger a recording when the motion sensor detects motion, rather than when the camera detects motion.
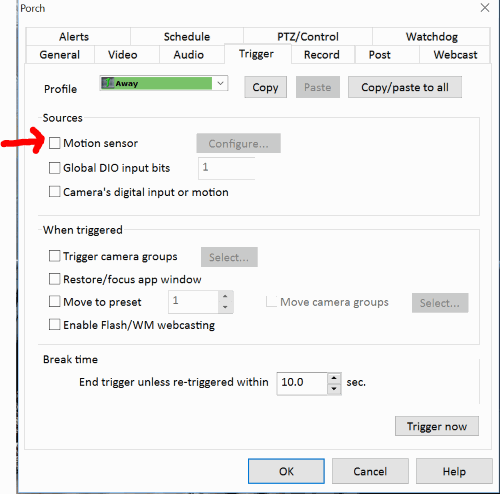
To do this, first turn off motion sensing in Blue Iris for each of your affected cameras. Remember that if you are using the geofence system I described a few months ago, you’ll want to do this for every relevant profile:
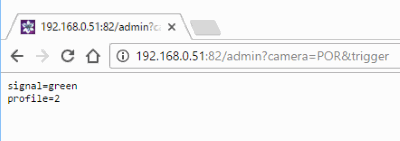
Now, the camera won’t record when motion is detected, but it will record when a “trigger” fires. You can make this action happen with a web request – specifically by making a request to http://blue-iris-ip/admin?camera=CAMNAME&trigger.
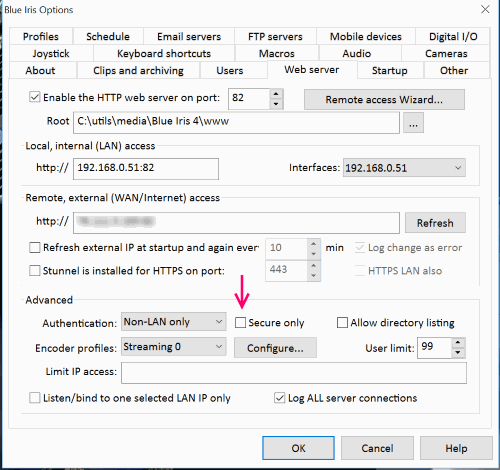
To allow this to happen, use the settings icon in Blue iris (the one that looks like a gear), and go to the “Users” tab to create a user/password. Then go to the “Web Server” and turn it on. You’ll also want to enable Authentication and make sure “Secure only” isn’t checked (tech side-note: this is so that you can use “Basic Auth” rather than session-based authentication).
Once you’ve confirmed that you can cause a camera to record using a web browser and the user/password you set up, you’ll use the paid add-on Network Module in the ISY-994i to do the same thing. Under the “Configuration” tab, go to the “Networking” tab, and then the “Network Resources” tab. Add a new Resource, and enter your Blue Iris IP address, port, and a path of /admin?camera=<CAM_SHORT_NAME>&trigger. Then click “Add” in the “Details” pane, and select “Authorization”. Here you’ll be able to add a user name and password, which will be encoded as a header.
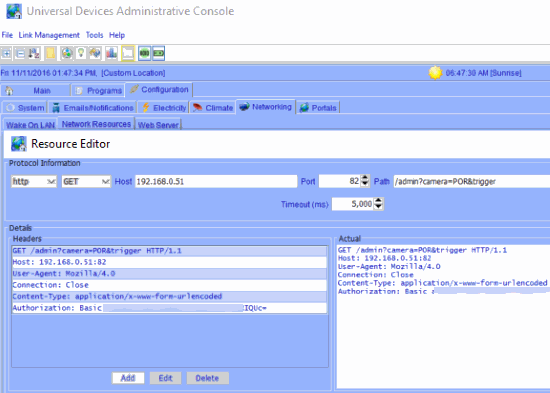
Save this resource, and then select it and click “Test”. You should see the camera image in Blue Iris highlight red and record for about 5 seconds. Now, you can use this resource in any program – such as one that detects motion. Note that the trigger seems to record for about 5 seconds, but I’ve found that in your program, you can call this network resource, wait about 3 seconds, call it again, and repeat – for as long as you want the camera to record.


