Track Electricity Usage with the Kill A Watt

The holiday season is upon us, and for many of us that means Christmas lights. For some of us, way too many Christmas lights:
extreme-christmas-lights

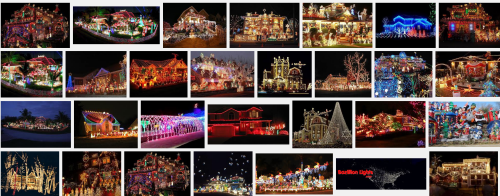
A question that comes to mind when seeing some of that extravagance is “how much does that cost to run”? Well, if you’re not quite ready for a whole-house energy monitoring system, there’s actually a neat little device out there that can tell you just how much power you’re using in any given outlet: the Kill A Watt plugs into an outlet, and your devices or lights plug into it. The large LCD screen displays several pieces of information, the most important of which is wattage.
kill-a-watt

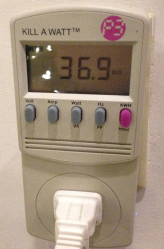
From the wattage, you can estimate how much power you’re using by converting to kilowatts and then multiplying by $0.10 (10 cents per hour is a decent approximation, but you can check your power bill to see exactly how much you’re being billed). That’s how much you’re paying per hour. So, in the above screen shot, the lights on my Christmas Tree are using about 37 watts, or 0.037 kilowatts. For every hour these lights are on, it costs me $0.0037 – less than a penny per hour! Another way to think of it is to simply say “for every thousand watts I use for an hour, it costs me 10 cents”. Of course, for extravagant displays that are using multiple kilowatts for many hours, the costs can quickly add up.
Read more ›

Posted by Matt Chiste
December 14

Soup up your home router with DD-WRT

Most people buy a home Wifi router, set it up, and forget about it. For most of them this is just fine, but as we enter the increasingly connected world of Home Automation, the standard software on those routers can be somewhat limiting. We’ll cover those limitations in subsequent posts, but for now let’s look at an alternative “operating system” that is available for most common Wifi routers.

What you may not realize is that virtually every electronic device you buy has software that runs on and controls it, much like Microsoft Windows controls and runs on your laptop. And, like Windows, that software can be swapped out with other software.

At a low level, this type of software is called firmware, and each Wifi router vendor such as Asus, Netgear, and Cisco/Linksys use their own custom firmware to power these devices. But there is an open-source project called DD-WRT that will run on many of these devices, and often provides much more sophisticated control of your router than what’s provided by the vendor.

dd-wrt Read more ›

Posted by Matt Chiste
December 8

Wiring 3-way Insteon Switches

We’ve shown how installing an Insteon Switch is really straight-forward: turn off power, remove old switch, connect Insteon switch to the same terminals, restore power. It’s easy to do and doesn’t involve any wiring changes at all.

Multi-way switches (also known as “three-way” or “four-way” switches) are those that allow you to control a single light with more than one physical switch. These aren’t quite as simple to install, and actually require a subtle change to the wiring. Don’t worry; you’re not going to have to go ripping up walls or anything, but it’s important to understand how these switches work. Wikipedia, of course, has an excellent image demonstrating how most three-way switches work using what’s called a “traveler system”:

3-way-switch-diagram Read more ›

Posted by Matt Chiste
December 5

A Christmas list for the Home Automation Guru in your life

Christmas is coming, and you may be looking for gifts to give that Home Automation Guru in your life. We’ve come a long way since this blog launched in May, so let’s round up some of the products we’ve covered (and will be covering in coming months) to give you some ideas.

First of all, even if you’re not buying a product listed here, you can support this blog by following (or bookmarking) this link: Shop Amazon and support Home Automation Guru. Amazon also has a dedicated Home Automation Store that has even more gift ideas!

Now, let’s take a look at some products we’ve covered:

What it is What it’s for / Related Posts
The central controller for the Insteon Home Automation System.

A simple plug-in module for lighting control.

Read more ›

Posted by Matt Chiste
December 2

Powering your LED pathway lighting with Insteon OutletLinc

Let’s take a moment to revisit the light strip mini-series of posts – we’ve covered a lot on the topic and it’s time to wrap it all up.
led-light-strip-stairs

We started with the selecting a location and installing a strip of LEDs underneath the banister to provide indirect lighting.

Next, I shared details on powering this light strip with a custom 3-D printed enclosure, motion sensor, circuit, and 9 volt battery. In that post I also introduced my Thingiverse account, which I’ll use to share future designs related to home automation and other hobbies.

After that, we took a little detour with a step-by-step guide for installing an OutletLinc power outlet in a new location.

As you may have guessed, that OutletLinc is the key to the system that allows us to ditch the battery-operated motion sensor. Of course, this is only possible if there’s a power outlet nearby, or you are able to install one. The first step is connecting the LED light strip to the OutletLinc – and that can be done with pretty much any DC power supply with output in the 9-12V range. You can connect the lights to the DC power strip by using an adapter like this one, or soldering the leads directly to the strip. Make sure to test the connection before soldering, since the lights will only work if the leads are connected to the right terminals.
led-power-connection

You’ll want to make the power cable as unobtrusive as possible, and even with an outlet near-by, you’ll likely still want to use a cable run for that finished look:
led-power-run

Once you’ve got everything physically connected, you’ll add the OutletLinc to your ISY-994i (like you did with the ApplianceLinc), then control the OutletLinc just like we controlled the SwitchLinc with a Motion Sensor.

Posted by Matt Chiste
November 21

Installing an Insteon OutletLinc

A while back, we talked about needing an electric outlet where one didn’t previously exist for our security camera. While that was an outdoor outlet that required the use of a GFCI receptacle, today we’ll cover the steps for installing an Insteon-enabled outlet inside.
insteon-outletlinc
Before we get started, here are a couple of points to keep in mind:

  • Be aware of what this outlet will be used for. We’ve talked about model variations in the past, but two main models are dimming (2472DWH), and non-dimming (2473SWH). While both have a non-controlled receptacle for things like blenders and vacuum cleaners, the dimming model is really only good for lamps and could cause damage to other devices. It’s rated for 300 watts (as opposed to the non-dimming model’s 480 watts), but it’s dual-band, which is a big plus.
  • If you are installing an outlet outdoors, or where wet conditions may exist (such as bathrooms and in the kitchen) you MUST use a GFCI outlet, which means that the outlet itself has a circuit breaker in it for safety in case it gets wet.
  • Insteon doesn’t offer an Insteon-controlled GFCI outlet, so if you want to put an Insteon-controlled outlet near a water source, you have three main options:
  • Outdoors, you could plug an outdoors ApplianceLinc into a GFCI receptacle
  • Indoors, you could plug an ApplianceLinc into a GFCI receptacle
  • In some cases, there is a single GFCI receptacle on a complete circuit. For example, you may notice only one outlet near your kitchen sink has the “test/reset” button on it, but if you trip the breaker with the “test” button, all other outlets around your sink lose power. This is because the outlets are wired in series, and in this case you should be OK installing an Insteon-controlled OutletLinc “down-stream” from the GFCI switch.

Read more ›

Posted by Matt Chiste
November 18

Battery-powered motion sensor for LED light strip

It’s been a little while since we covered installing LED Light Strips on stairs for pathway lighting. This concept has evolved over time, starting with wiring the LED lights down a plastic cable run trimmed to direct the light down:
light-stairs-prototype-1

Early on, I realized that moving the lights higher (like under the banister) provided more even lighting, and on many stairs there’s rarely an outlet nearby. So the first-generation model I built was a battery-operated solution using a motion sensor and transistor wired with a mini development breadboard:
light-stairs-prototype-2
light-stairs-prototype-2-circuit

Over time I ended up building all of these components into a custom-designed enclosure that I printed with my 3D Printer for a much more polished look:
light-stairs-motion-battery-enclosure Read more ›

Posted by Matt Chiste
November 11
 Subscribe to HomeAutomationGuru.com
    Add to Google Reader or Homepage

Enter your email address to subscribe: