Wiring ethernet between floors

Now that we’ve determined ethernet offers much better download speeds than wifi, how do we make it happen? There’s a great article on Instructables (via LifeHacker) covering some high-level topics, and I encourage you to check that out. I’ll try not to simply repeat all those steps here, but offer some alternatives on my particular installation.

Wiring a two-story house with a basement wasn’t easy, but with some drywall-patching experience, running cables between floors is possible. I have cable service coming in from the street into the basement, so that’s where it made the most sense to install the cable modem (the in-house coax cables are pretty shoddy, so avoiding them allows the cable modem to get a stronger signal). There’s a Wi-Fi access point down there, and a CAT-7 cable that runs up two floors into the attic, then back down to a closet where another Wi-Fi access point is set up, along with a switch and some other gear. The TV on the main floor and office also have hardwired connections – more than one to the TV room to cover the other electronics in the entertainment system.

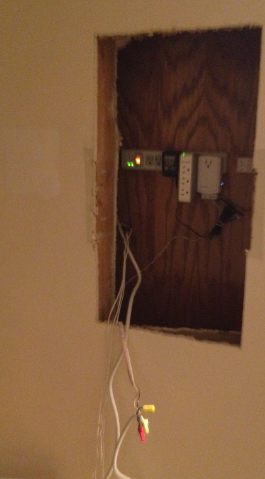
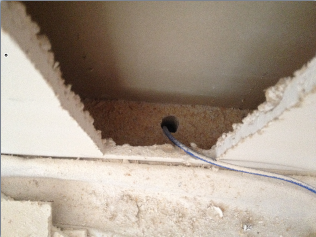
Dropping a cable down from the attic to the next floor is pretty straight-forward, and covered in that Instructables post. But when traversing more than one floor, some drywall surgery is necessary because you need to be able to access the joints between floors. This isn’t as hard as it sounds; basically you cut a hole large enough to fit a drill in and drill a 1-2 inch hole into the 2×4. Remember that because you’ll be patching the hole in the wall, smaller is not necessarily better – give yourself plenty of room to work with.
ethernet-conduit-down

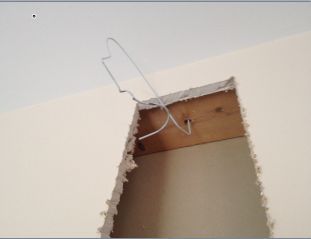
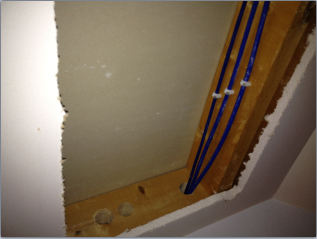
Use a coat hanger to fish the wire through on the other side, and tack your cables to a stud to keep them neat and out of the way in case there is any future wall cutting. Note that you’ll want to keep these cables away from power lines in the walls, and if you do have to intersect a wire carrying live current (say to an electric outlet), try to cross the wire at a 90 degree angle to prevent interference on the line. Also keep in mind that there is a gap of up to 16 inches between floors, so you’ll need to drill holes from both the top and bottom on each level. Before sealing things back up make sure to spray in some fire-break foam in the hole, which will prevent the wall cavity from acting like a mini-chimney.
ethernet-conduit-up ethernet-conduit-stud Read more ›

Posted by Matt Chiste
July 27

Use wired ethernet instead of Wi-Fi when possible

LifeHacker, one of my personal favorite blogs, recently ran a poll on how many of their readers use a wired network in their house as opposed to wireless only. A surprising minority were exclusively wireless, with most people reporting at least some of their devices being wired – and this is a good thing! We’ll discuss a wiring project in our next post, but I’ve recently run some speed tests using SpeedTest.net, testing on my Dell Laptop in three configurations: wired, Wi-Fi two floors away, and Wi-Fi right next to the access point.

The results were pretty telling: network speed on a wired connection is understandably good (I have a 100Mbps Xfinity connection by Comcast – getting real speeds of almost 80Mbps isn’t too bad!):
wired

When I was in the same room as the Wi-Fi access point, you can see the download speed comes nowhere close to being physically wired – it’s 65% slower:
wireless-mrc-down

When I tested again two floors away from the Wi-Fi access point, download speed dropped off another 30%:
wireless-mrc-up

The takeaway here is that not only is wired ethernet dramatically faster than Wi-Fi, but distance matters when connecting wirelessly – if you have a multi-floor house it might be worth considering the use of multiple access points.

Posted by Matt Chiste
July 24

Insteon-Controlled Thermostat

While I was installing my home command center, I also took the opportunity to replace my existing thermostat with an Insteon Thermostat (well, technically a slightly older-looking model).

Wiring these guys up is pretty straight-forward: you simply pop the cover off the existing thermostat and note where all the wires are connected. Both of my thermostats were different, but generally you’ll see that there are letters for each lead that will correspond to the letters in your Insteon thermostat, with different colored wires for each, so it’s a one-to-one mapping:
old-thermostat-connections
old-thermostat-connections2
Read more ›

Posted by Matt Chiste
July 21

Build a Home Command Center for your Smart Home

Remember those old tape deck-based intercom systems popular in the ’80s and ’90s that allowed you to play music and page different rooms of the house? When I bought my house in 2011 (built in ’89) they still had one of those guys mounted on the wall in the kitchen. It was great nostalgia being able to turn it on and hear an unintelligible buzz throughout the house, but I figured it was time for an upgrade. Using my new-found drywall expertise and some ’80’s-era woodshop skills I learned in shop class, I decided to build a modern central command system.

Step one was removing the old system and marveling at the ancient electronics that went into this thing. I spent quite a bit of time labeling all the wires, thinking that the low-voltage connections to the various rooms that had the intercoms might come in handy, but in the end I just scrapped all that – although one wire I’m glad I labelled was the doorbell leads (more on that later).
tape-intercom-removal

Once that was done, I expanded the hole between the studs and happy to discover a large cavity and available power inside the wall, where I wired in a power strip to power the eventual devices on the outside:
wall-cavity
Read more ›

Posted by Matt Chiste
July 18

Gather useful energy consumption stats with the eMonitor

As you’re building your Insteon-enabled Automated Home, you may start developing an interest in other things related to a Smart Home, such as power consumption. When I got this energy monitoring bug, I did some research and found the eMonitor Energy Monitor from Powerhouse Dynamics, but in hindsight I would have investigated the Brultech Energy Monitor because of its ability to integrate with the ISY-994i and MobiLinc, a great app we’ve already covered. I went with the eMonitor about 18 months ago and haven’t looked back at the Brultech, but I’d be interested to hear in the comments if any of you has had any experience with it.

All of these energy monitoring solutions work pretty much the same way: with an inductive coupling ring installed around the power wires in your breaker box (sometimes just on the main input line to measure flow into the house). The current that flows through the wire generates a magnetic field that induces a small current in the coupling to be read by the monitor, which can in turn be viewed through a web browser (or integrated with the ISY-994i for other powerful functionality). The scary part is taking the cover off your breaker box to install the couplings – even though you will turn off the main breaker before doing so, you still need to keep in mind that the main power coming off the street is still live, and can kill you. Ideally you would turn off the power at the street, but that’s not an option in most homes I’m aware of.

Once you have identified each of the circuits in the breaker box, turned the main breaker off, and removed the cover, you’ll clamp the coupling around the wires going into each breaker/circuit. This can be quite messy with smaller boxes and lots of circuits:
breaker-box-emonitor
You then wire the control box up to its own circuit for power, jam all of that stuff back in there, re-attach the front panel, and turn the power back on. Read more ›

Posted by Matt Chiste
July 15

Laser-etched KeypadLinc Buttons

When we covered the KeypadLinc, we talked about how you could get a 50-pack of buttons with different text or use a 4-Color LED Color Change Kit to get different colored buttons.

But, to truly give your 8-button Insteon KeypadLinc a personalized setup, I recommend going with a custom-printed solution from smarthome.com. This one’s a no-brainer: at the time of this writing, the 50-button set currently lists for about $28 on Amazon, while the 8-button custom set (list price around $50) is on sale for $20 – and you’ll get exactly what you need once you decide which function you want for each button.

For example, there’s only one “Garage” button in the pre-printed set, but if you have a 2-car garage, you may want a button for “Garage 1” and “Garage 2”:
keypadlinc-custom-etched-buttons
Read more ›

Posted by Matt Chiste
July 12

Programming an ISY-994i for Motion-Controlled Lights

As discussed in an earlier post on the Insteon Motion Sensor, the most basic of setups for having a motion sensor control a light switch is through the use of a scene. You would create a new scene that included the switch as both a controller and a responder, and add the motion sensor as a controller. That way, when motion is detected, an “on” signal is sent to scene (turning on the switch which is configured as a responder), and when the timeout period expires, an “off” signal is sent.

That’s simple, but there’s a use case where it makes sense to introduce an ISY-994i program: what happens if you’re in a room and not necessarily moving, such as when you’re watching TV or staring blankly at a rock for several minutes? The problem with the scene-based approach is that, because no motion is detected, the lights may end up turning off on you while you’re still in the room, so we need some way to override the motion sensor when we’re planning on some quality rock-staring time. There are LOTS of different ways to do this, but we’ll cover a reasonably simple setup here.

First, let’s check our motion sensor configuration:

  1. Open the battery compartment on the back of the sensor and confirm that the 5th jumper pin is attached. This allows us to configure the motion sensor through software, rather than those other jumpers and dials (see the motion sensor manual for details):
    motion-sensor-jumpers
  2. Next, hold down the set button for about 5 seconds until the LED on the front starts blinking. This puts the device in “set” mode so that the ISY-994i can “talk” to it (to conserve battery life, Insteon wireless devices aren’t always “listening” for updates; they just send signals when events occur).
  3. Now, select the sensor in the ISY-994i device list, and click the “Options” button on the right, which will bring up the configuration for the sensor:
    configure-motion-sensor-2842
  4. Here, you’ll want to put in a value for the Timeout (number of minutes the lights will stay on), and you want to check the first and second boxes, to notify the network when motion is continually sensed and to send an “Off” signal when the timeout expires. Depending on whether you want the triggers to fire only at night, you can un-check the last option. For example, in a basement where there aren’t windows you’d leave this unchecked so the lights go on every time, but in a naturally lit room you’d want it off so that motion is triggered only when it’s dark outside. You can tweak the Darkness Sensitivity if you find the lights going on when it’s not very dark out, or not going on when it is pretty dark. The lower the number, the more dark it has to be for the event to fire.
  5. Click “OK” and the configuration will be written back to the sensor.

Read more ›

Posted by Matt Chiste
July 9
 Subscribe to HomeAutomationGuru.com
    Add to Google Reader or Homepage

Enter your email address to subscribe: