If you’re not using something like MobiLinc Connect to remotely access your home automation system, it’s likely that you’ve created a personal domain name, and maybe even secured the connection to your home network with free VPN software with DD-WRT. But it’s a bit of a pain to start up a VPN connection on your phone just to check if you left any lights on. You really shouldn’t open up your ISY-994i to the Internet out-of-the-box with just the default password security, because that user name and password can be picked up by the bad guys on insecure networks. Fortunately, there’s a way to get the best of both worlds with SSL: encrypt all the traffic (including your user name and password) to the ISY994i but not have to start a VPN connection every time you want to do something. You can do this for no cost by using what’s called a “self-signed certificate”, but that means you’re likely to get a browser warning every time you try to access your ISY via a web browser. Instead let’s look at the process for creating an SSL certificate from a trusted certificate authority like GoDaddy.
The process for setting up an SSL certificate isn’t obvious if you’re using the default interface to the ISY, but is reasonably well-documented here. The trick is that you need to load a java applet from Universal Devices that will connect to your ISY locally, with a URL like http://isy.universal-devices.com/994i/4.1.2/dashboard.jnlp (the 4.1.2 in the URL needs to match the firmware version you’re using). One thing I noticed was that, after installing java, clicking the link in my browser tried to download a .jnlp file rather than run it. The solution was to associate .jnlp files with the Java WebStart executable (javaws.exe).
Basically you’re going to:
- Log in to the ISY994i dashboard interface
- Go to network settings and generate a CSR, or Certificate Signing Request
- Use that CSR to purchase an SSL certificate from a Certificate Authority (in our case, GoDaddy)
- Import the purchased certificate to the ISY994i
- Open up your firewall to allow 443 traffic through to the ISY
- Connect remotely using https:// instead of http://
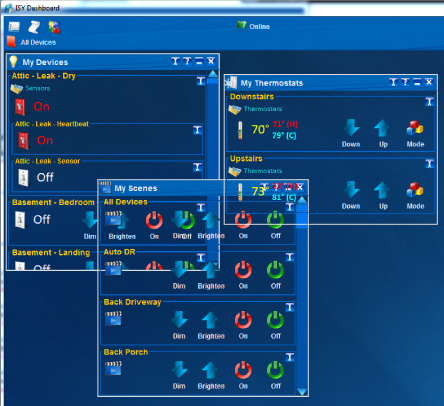
Log in. Once you’re running the dashboard, the interface will look something like this, which despite being a little messy is still a pretty neat alternative GUI to the default ISY994i interface:
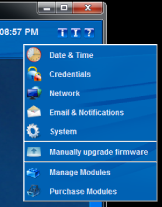
Generate a CSR. There’s a little settings icon in the upper-right corner which will open up a menu where you’ll pick “Network”:
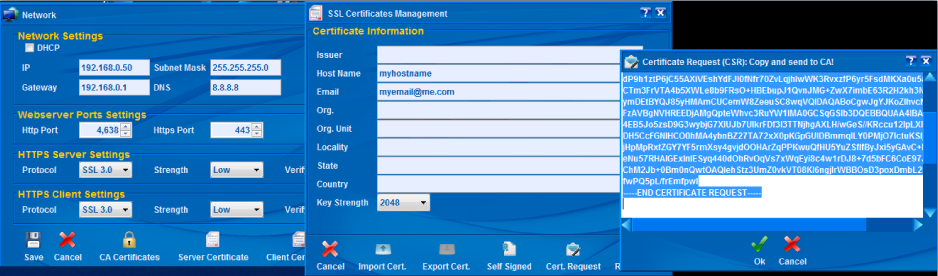
In the network dialog, you’ll click “Server Certificate”. You want to use your email address and most importantly the “Host Name” setting that you’ll be using to connect to your ISY-994i. This host name is part of the certificate so if you use a host name here that’s different than the URL you’re going to be accessing the device with, you’ll end up with certificate security warnings in your browser. Finally click “Cert. Request” to get a long, messy looking text string that you need to copy to a text file on your desktop. That’s your “CSR” which needs to be sent to your certificate signing authority.
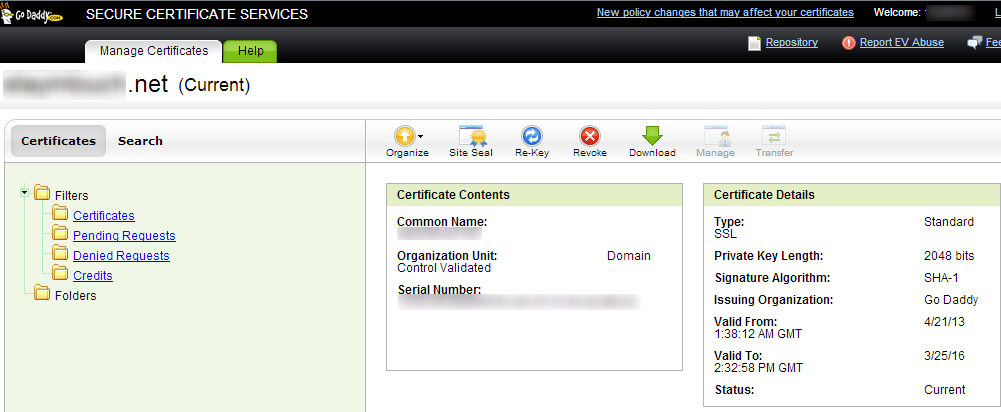
Purchase the SSL certificate. SSL certs aren’t incredibly cheap and you will no doubt be able to find them cheaper than GoDaddy, but GoDaddy makes it relatively easy to get things set up (if you can stomach the obnoxious ads). Get started here, and once you purchase a “single-site” certificate you’ll be prompted to enter your CSR. Once you do GoDaddy will provide a mechanism to download the certificate locally from the console with the “download” button.
Import the purchased certificate into the ISY. Going back to the ISY dashboard-> Network Settings -> Server Certificate, click the “Import Cert” button. This will prompt you for the certificate file you purchased, and install the certificate.
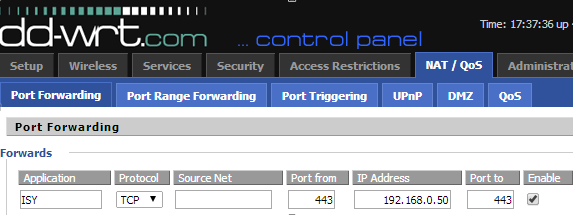
Configure your firewall. Now, although the certificate is installed, you won’t be able to go to https://192.168.0.xx/ without getting a browser warning because the IP address on your local network won’t match the DNS name on the certificate. And you won’t be able to access https://mypersonaldomain.net/ because your firewall is blocking access to the SSL port (443). So the final step is to configure Network Address Translation in your router to send traffic coming in to port 443 to go to your ISY994i. You do this under “NAT/QoS”->”Port Forwarding”, and specify a “Port from” (and “Port to”) of 443 with the IP Address of your ISY on the local network.
Connect using HTTPS://. Finally, you should now be able to test out accessing your ISY994i from the Internet using https://mypersonaldomain.net/. In Chrome you can click the padlock icon and see details of the SSL certificate.


