Setting up the ISY-994i

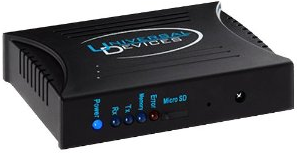
Now that we have the ISY-994i, let’s get started setting it up.

Set-up is pretty simple with your existing network. Think of the ISY-994i as a tiny, low-power computer that bridges the gap between your home computer network and the Insteon network. It can run programs and manage devices and scenes from any web browser (and more than a few iDevices and Android devices, for that matter).

First let’s let at how things are connected. Generally, you’ll have an internet connection to the outside world, which is powered by your router. The ISY-994i connects to that router, which is how you access it from your network or the Internet. The ISY also connects to the PowerLinc modem through a serial port, which plugs into an electrical outlet; this is how the ISY communicates with wired devices on your Insteon network.

The PowerLinc modem is dual-band, which means that wireless devices can also connect to it directly. Remember, though, that because Insteon is a mesh network, they might not have to connect directly, so don’t stress too much about where to physically install this thing. If your PowerLinc is on the second floor of your house and there is a motion sensor in your basement, the motion sensor might be out of range. But, the motion sensor could connect to a dual-band light switch down there, which could in turn connect over the power lines to the PowerLinc. The beauty of the Insteon mesh network is that these are details you don’t really need to care about, or even understand – generally it will all just work!

Here’s a visual representation of how everything is connected:
isy-connectivity

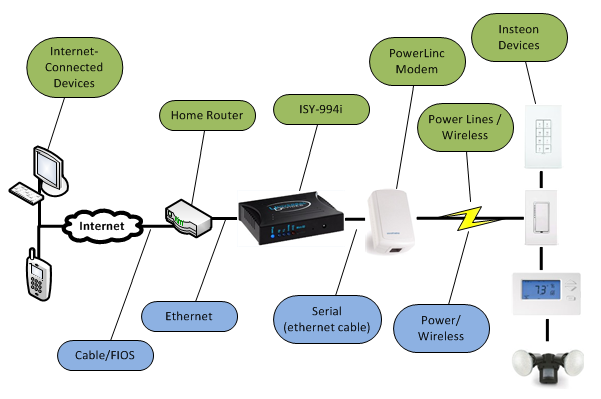
Physically, you’ll connect an ethernet cable from your router to your ISY-994i. From there, you’ll connect the ISY-99i with an ethernet cable to the PowerLinc modem (but for you techies out there, don’t be mistaken – this is not an ethernet link, but a serial connection). Finally, plug the PowerLinc modem into the wall. Note that you shouldn’t plug the modem into a device that may interrupt the power line signal. For example, some surge protectors and Uninterruptible Power Supplies (UPS) devices have filters that can interrupt the signal, so if you have trouble, take those devices out of the loop and plug the modem directly into the wall.

When you power it up, the ISY will get a dynamic IP address on your network, and should show up in your PC’s “My Network Places”. So you should be able to connect to it by entering http://isy/ in your browser, but see the ISY User Guide or Universal Devices’ Wiki for more information on how to connect from your browser.

Posted by Matt Chiste
June 8

The Heart of your Insteon System: ISY-994i

Insteon is a very powerful system that can be as simple or as complex as you would like. Technically, you don’t even NEED a “heart” of your system at all. We discussed Insteon devices forming a “mesh network“, and because every device can “talk” to every other device, you can set up simple “scenes” without a central controller at all. The process generally involves pressing and holding a button on one switch, then running over to the other device you want to add to the scene and pushing the switch on it. This is fine for smaller networks, but can quickly grow to be quite tedious.

It’s also worth noting that you can get a simpler centralized device called the Smarthome 2412N SmartLinc INSTEON Central Controller. This device is also good for smaller networks, but I found that after about a month of using it, I was disappointed with the weak web-based interface and iPhone control.

Instead, I strongly recommend Universal Devices’ ISY-994i (more details here. It is more pricey but definitely worth the cost in the power, flexibility, and remote control options available. It’s a small device that plugs into your router and power line network to allow powerful control of your system from anywhere in the world.
ISY-994i

The user interface can be a little daunting for non-programmers, but it does a good job of balancing simplicity with power:
ISY-994i-interface

We’ll cover more on the setup in subsequent posts, but again, if you’re serious about getting started with an Insteon system, this is the device to get.

In addition to the ISY-994i, you’ll also need a Smarthome 2413S PowerLinc Modem INSTEON Dual-Band Serial Interface. This device acts as the bridge between the ISY-994i and the Insteon network, and is dual-band so it can connect to both wireless devices (such as motion detectors and contact switches) as well as wired ones (such as standard switches and keypads).

Once you’ve got the ISY-994i and PowerLinc Modem, stay tuned and we’ll cover the various devices that you can integrate with your network!

Posted by Matt Chiste
June 6

Your Insteon-enabled Home

As I’ve mentioned, Insteon is a powerful do-it-yourself type home automation system that trumps other options in many key areas. There are a couple of key features that are worth pointing out before diving into your own projects, so let’s take a look at why Insteon is such a great technology:

  • No Additional Wiring. This is a big one for the vast majority of homeowners out there. Your existing electrical infrastructure likely does not need to be changed at all to implement Insteon. There is no need to run new wires anywhere – you simply replace existing switches and all the devices communicate with each other over the existing lines. And if you truly don’t want to replace any switches at all, you can use modules that simply plug into existing outlets.
  • Mesh Network. The Insteon network in your home builds a “mesh network” where each device communicates with one or more other devices. The more you add to the system, the stronger it becomes. So if you want to turn off a light on one side of the house when a switch is pressed on the other, those devices might not communicate directly. The signal might go to an intermediate switch, where it is relayed until the target device is reached. See the animation at Insteon.com for an example of how this works.
  • Dual Band. In addition to sending signals to other devices over the existing power lines in your home, some devices are Dual Band, which means they not only communicate over the power lines, but they also can communicate wirelessly with other devices. So, for example, you may have a battery-operated motion sensor on your driveway, and you want it to turn on the kitchen light when motion is detected. In this case, the motion sensor would send a wireless signal to the nearest switch, and that switch would in turn send a signal over the power lines to the kitchen light.
  • Secure. Because signals on power lines can potentially be shared between homes, X-10 systems require house codes to prevent your neighbor from turning on one of your lights. Insteon solves this problem by using one of 16 million addresses for each device and encoding messages on the network.
  • Powerful scene-based setup. As you get accustomed to the power of home automation, you’ll come to realize that there is no longer a one-to-one correlation between switches and lights. Any switch can operate any light in your home, and any switch can operate multiple devices through scenes, complete with different dim levels for each device. For example, you could have a “home” switch that turns on several lights, and adjusts the thermostat at the same time, or an “away” switch that shuts everything down from one place.

Posted by Matt Chiste
June 4

Why Insteon?

There are lots of home automation technologies, products, and services out there. And while this blog is called HomeAutomationGuru, the technology that we’ll really focus on here is Insteon.

insteon-logo

I’ve always had an interest in Home Automation, and even bought some X-10 devices back in the late 90’s. But aside from a lamp here or there, I never really implemented any serious automation. A couple years ago, I sat in a meeting with a Home Automation company pitching a project to a new home builder. The salesperson was trying to sell a very high-end technology called Crestron, and the conversation went pretty much like this:

Me: “What do you think about X-10?”
Salesperson: “X-10 is the K-Mart blue light special of home automation. Cheap, but crappy and unreliable.”
Me: “How about Insteon?”
Salesperson: “More like Walmart. Reliable, but still cheap.”
Me: “So you really think Crestron is the way to go?”
Salesperson: “Definitely – they’re the Neiman Marcus of the industry!”

So, apologies to K-Mart for them getting the bottom of this analogy. But, in comparing Insteon with Crestron, the analogy is apt: Crestron is a (much) more expensive, premier product based on its brand name, but Insteon can pretty much do everything Crestron can do – and in some cases more – at a price and accessibility point for the masses.

I actually looked into Crestron when I was automating my own home several months later. But Crestron is not for do-it-yourself’ers. In fact, you can’t even buy their products directly – you have to find an “Elite Partner” to do the work for you, since it involves extensive re-wiring. Insteon, on the other hand, is completely accessible, can be retrofitted into existing homes, and you can start small and expand over time. To see what I mean about “accessibility”, just look at the comparison of an Amazon search between Crestron and Insteon – good luck finding replacement or expansion hardware for Crestron!

In time, I will post a more comprehensive comparison of the various home automation technologies out there – such as Crestron, Control4, Zigbee, Insteon, and X-10. But, suffice it to say, I’m a “Walmart guy” – inexpensive and simple trumps brand name any day – and Insteon was the system I chose based on that philosophy.

As for those homeowners who went with Creston a couple years back? They basically have a bunch of really expensive light switches, and I suspect are a little envious when I show them the system I built for 1/10th of the cost. It certainly doesn’t help when I show them things I can do that they still can’t – such as lock my doors, adjust the thermostat, check security cameras, and set up motion-activated lights from anywhere in the world on my iPhone.

Posted by Matt Chiste
June 2

Welcome to HomeAutomationGuru.com

Welcome!  This blog will be dedicated to all things related to Home Automation – and more than a few that are not completely related as well, including DIY home improvement projects.

The content you will find in this blog is all based on personal experience with various technologies that I have employed and used over the years in my own home. In particular, it will have a strong bias towards Insteon, iDevices, and DIY tips and tricks – simply because that’s the technology I’ve implemented myself.

I’m a tech consultant and software developer by day, and am not a licensed electrician or carpenter. Some of these projects can be dangerous, but certainly aren’t outside the realm of “doing it yourself”. That said, proceed at your own risk with some of these things – or hire an experienced contractor to take care of it for you.

This isn’t going to be a bunch of unbiased news articles about high-level trends, but more personal experiences that hopefully you’ll find to be educational, entertaining, and sometimes snarky.

Finally, I have set up an Amazon Associate Account, which I’ll use to link to products I review. You can support this site by using these links to purchase any products you find interesting or useful.

Enjoy!

Posted by Matt Chiste
May 30
 Subscribe to HomeAutomationGuru.com
    Add to Google Reader or Homepage

Enter your email address to subscribe: