Hide clutter in MobiLinc with a character prefix

Here’s a quick and simple tip for you MobiLinc users out there: regardless of how your ISY994i folder structure is set up, you likely have a bunch of devices, scenes, or programs that you just don’t want to show up in the MobiLinc interface. For example, my office folder looks like this – notice how there is a KeypadLinc and a RemoteLinc represented by a bunch of different devices:
isy-device-interface

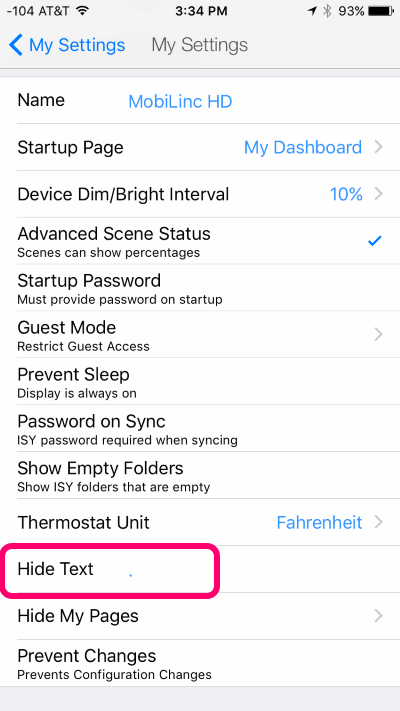
I don’t need all those keypad buttons showing up in that MobiLinc folder (after all, if I want to turn off the living room lights, I’d just go to the Living Room folder in MobiLinc), and the RemoteLinc isn’t needed either since you can’t actually control a RemoteLinc. So, notice how I name all those devices starting with a period character? That’s not just so that they show up alphabetically first, but when you go into MobiLinc, you can add a “Hide Text” string in the settings menu:
mobilinc-hide-text
This could be anything – a period like I’m using, a word like “hidden”, or characters like “zz” to get those devices to show up at the end of the alphabetized list in the ISY994i. Read more ›

Posted by Matt Chiste
April 3

Why do we do home automation? Because we can!

Why do we do Home Automation? Because we can!

Now get back to work!

Posted by Matt Chiste
April 1

Wall-mounting a photo frame powered with custom-made USB cable

Table-top photo frames based on Android are great and all, and I’ve already covered a wall-mounted frame which is powered through existing low-voltage lines, but I wanted to replace that old photo frame with my new Lenovo Tablet for not just photos but also as another console for my custom Intellihome app. This would give me a secondary location where I could control my home automation system, similar to this setup but without the extra computer powering it.

This posed a couple of challenges: by itself, the tablet would look a bit awkward on the wall, and the existing power connector was a bullet-connector rather than the mini-USB that the tablet provided. I resolved the first problem with some re-purposing of an old frame and 3D printing, and the second with a bit of testing and soldering.

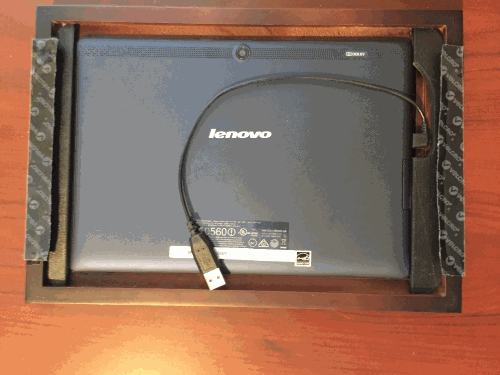
First, the original frame was some ancient Kodak job that I got as a gift, so I’m not even exactly sure it’s available any more to link to. But the wood frame containing the electronics was mercifully easy to remove, and even better was almost a perfect fit for my tablet – just a little too wide. Fortunately, the power switch for the tablet is on the side and I’d need a tiny bit of space to access it and the USB port from the front of the frame, so the extra width was actually very helpful. Using a caliper I measured the exact dimensions of the mounting brackets I’d need, and modeled the parts in the awesome, free AutoDesk 123D Design. Printing out the parts on my FlashForge 3D printer to make room for the power button and short right-angle USB connector, and attaching some velcro to the back, I ended up with this:
photo-frame-back Read more ›

Posted by Matt Chiste
March 30

Setting up a family-friendly photo frame with online sharing

For Christmas last year I wanted to get a digital photo frame for some family members that would allow us to share pictures between us and have the pictures automatically update over time. I had already wired up a wall-mounted photo frame but its capabilities to dynamically update over wifi were really lacking – and forget about sharing among multiple frames. So I did some research and focused in on using an inexpensive, general-purpose Android tablet that would fit the bill, and found this 10 inch Lenovo Tab 2 model. It’s got great resolution and a wide viewing angle – ideal for an always-on photo frame. I also included a case that would act as a stand for table-top viewing. The end result fits right at home on any table-top:
photo-frame

What I didn’t anticipate is how tough it would be to get the right mix of software on there to behave like a photo frame and automatically update from a shared location. I tried Google Drive, DropBox, and some other online services but ultimately decided on using Google Drive as the online photo repository, since it has a more generous offering of free space and shared folders don’t count towards both people’s quota like DropBox’s service does. I won’t even go into the dozens of different apps I tried out to get things to work right (automatically downloading pictures, running in full-screen, automatically starting when the device boots, etc.), but ultimately my non-techie family members (i.e., the parents and grandparents) have a photo frame that the rest of us more technical ones (i.e., the kids and grandkids) can upload and share photos to.

Before I get into the instructions of the apps I used on the tablet, I wanted to give a shout-out to Google Photos for being an absolutely awesome piece of software. Not only does it allow for you to upload your entire repository of photos (for free if you accept them as slightly down-rezed), but it has some really sweet features such as doing image and facial recognition on the photos so you can, say, just find photos of a particular person (“mom”), place (“Brazil”), or thing (“beach”). And it has an “Assistant” that does things like create animations, collages, and slide shows from its contextual awareness of the pictures. It really is a great service, but in this particular case it didn’t meet my needs for a photo frame with the ability to share pictures between devices and family members. So, I’d highly recommend the app – and if you just want a photo frame for personal usage it might meet your needs, as there are Android and iOS apps available. Read more ›

Posted by Matt Chiste
March 26

Creating nested conditionals in the ISY994i

Reader Jimmy wrote in with the following suggestion (apologies for this coming as Spring is upon us, but the takeaway for nested conditionals in the ISY994i is relevant year-round!):

Now that it is winter and humidity control is needed how about a blog on that? Here is my set up:

  • 2441TH Insteon thermostat with humidity monitoring.
  • 2450 IOLinc for switched output for humidifier on/off control
  • AprialAir 800 whole house humidifier (steam in air duct)
  • Climate Module for local temperature (I know I could have a thermistor input for local temp but I use the Climate Module for irrigation control also)

So I have it programmed that if house humidity is less than 45% and the heat is on and the fan is on (I run fan continuously) and the outside temperature is < 40 degrees the humidifier is turned on. This works great until the temperature drops below 30 degrees then the windows sweat up. I do not know how to do nested If-then to create a program that follows the recommended humidity settings to avoid this.

  • If temperature outside is 30 to 40 degrees and humidity inside is less than 45% then turn on but…
  • If temperature outside is 20 to 30 degrees and humidity inside is less than 35% then turn on but…
  • If temperature outside is less than 20 degrees and humidity inside is less than 25% then turn on.

Anyway a blog on the above application or how to do nested if then would be great.

The answer to this one is pretty simple – in the ISY UI, there are these somewhat hidden buttons in the bottom right corner of the program window that allow you to add “ANDs” and “ORs”. Simply click either and use the “Move Line Up” or “Move Line Down” buttons to group the conditionals together. Here’s an example where I’ve done a complex conditional in the ISY for turning on lights for a period of time when motion is detected – but only if it’s after dark and only if the lights aren’t already turned on at full level:
isy994i-nested-conditional Read more ›

Posted by Matt Chiste
March 22

The Blue Iris App enables remote home security monitoring

I’ve called the Blue Iris desktop application a “must-have for Foscam security cameras owners“, and while I wasn’t happy with a broken firmware setting in the cameras, I still highly recommend the combination. In fact, the application got even better since that original post with the release of Blue Iris 4.0, adding neat features like a timeline to the view. And then, for me at least (apparently this little gem has been around for almost 3 years!) I discovered the Blue Iris Mobile App (available for iPhone and Android), and it got even better.

The Blue Iris App
Installing and connecting the mobile app is simple enough – you just enter part of your license key to pull your remote IP address and enter a user name and password. This part requires a bit of firewall tuning to open a port up, and in my case I have a personal domain which meant I had to manually enter the connection info, but it shouldn’t be too hard if you have experience with firewalls. The Blue Iris desktop application has a handy “Remote Access Wizard” to help you out, although it still requires a bit of technical know-how.

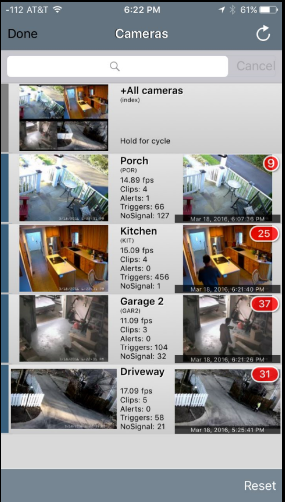
Once installed, you can view real-time and recorded video easily through the app – it even counts recorded clips from cameras so you can tell at a glance how many have been recorded – even when the app isn’t running (on the iPhone at least, the number of alerts shows up as a notification icon):
blue-iris-app-cameras Read more ›

Posted by Matt Chiste
March 18

Installing a wall-mounted projector

The family room now has in-wall speakers powered by an HDMI audio extractor and small amplifier, and now it’s time to set up the video component: an Epson PowerLite Projector. I liked this particular projector because it’s capable of 1080p resolution, it has horizontal lens-shifting (which means it doesn’t have to be placed exactly on-center with the projected screen), great brightness (although not great enough to be acceptable in a room with open skylights in the middle of the day), and solid 4.5 stars on Amazon.

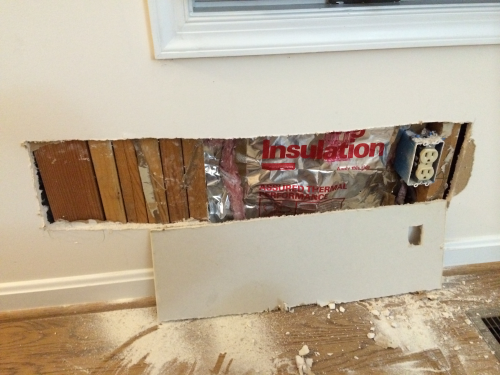
With the multiple video sources in the basement feeding up to the projector via ethernet cable, I wanted to run the HDMI cable inside the wall horizontally and install a new outlet up on the wall, with power run from an existing outlet below. I’ve installed quite a few new outlets, so I figured the power wouldn’t be too much of a problem; just run some Romex through a few studs from an existing outlet and then up the wall. But then I ran into this craziness:
living-room-studs

Yes, that’s 5 adjacent 2x4s and a 4×4 – about 11 solid inches of wood that clearly has some sort of load-bearing purpose. Not being a structural engineer (and just as importantly, not having an insanely long drill bit to get through all this wood), I abandoned that idea. And, being unclear on where else I might find this unusual stud formation in the wall (not to mention taking on even MORE drywall work), I gave up on the idea of running the HDMI cable horizontally through the studs as well. For now, at least. Read more ›

Posted by Matt Chiste
March 10
 Subscribe to HomeAutomationGuru.com
    Add to Google Reader or Homepage

Enter your email address to subscribe: